Whether you want to skin up at the resort or go on an all-day backcountry journey, owning a splitboard gives you freedom to roam without having to wait in a lift line. But to fully enjoy your experience going uphill and riding back down, you'll want a splitboard that's built for the type of adventure you want. In this article, we'll help you find that board by looking closely at the following:
Before buying, you'll also want to read through our article How to Choose a Snowboard—a splitboard is a snowboard, after all, so you'll find some helpful info in there, too.
A Quick Guide to Buying a Splitboard
While not every snowboarder will agree on what type of splitboard is right for specific conditions or terrain, the following general recommendations are a place to start for some common scenarios:
- Splitboards for long backcountry tours/mountaineering: If your goal is to summit big peaks or go deep into the backcountry, you'll be gaining lots of elevation and traveling lots of miles. Choosing a lightweight splitboard will help you travel more efficiently and conserve energy. A board made with carbon fiber is your lightest option, but it will be pricey. If that's too expensive, look for a lightweight board that uses fiberglass instead. Also pay attention to the board shape and profile, and consider choosing one with a directional shape and either a camber or a camber/rocker profile. These attributes tend to provide better edge grip and more efficient uphill travel than boards that have a twin tip shape and lots of rocker.
- Splitboards for riding deep powder: Powder-oriented boards are typically very wide up front and tapered toward the tail. Their directional or directional/twin shapes and rockered noses provide good flotation in powder. Some powder splitboards are shorter in length than a typical snowboard but quite a bit wider, which creates lots of surface area for good flotation.
- Splitboards for all-mountain riding: These can run the gamut from directional to twin tip and cambered to rockered. And since everyone likes something a little different, saying exactly what works best for all-mountain riding can be tough. So, we recommend starting by looking at the type of snowboard you ride now. If you like your board and feel comfortable riding it all over the resort, find a splitboard with similar specs.
Splitboard Length
Choosing the ideal-length splitboard is very similar to choosing the right length of a conventional snowboard; the easiest way to go about it is to consult a size chart that lists appropriate board lengths for body weight ranges.
At REI, we list recommended rider weights in the spec charts of individual boards on REI.com product pages. For instance, you might see that a 158cm board has a recommended rider weight of 150-200 lbs.
The following size chart can also be used to give you a good idea of the right board length based on your weight:
Snowboard Size Chart
Rider Weight (lbs.) | Snowboard Size (cm) |
|---|---|
110-120 | 128-136 |
115-130 | 133-141 |
125-135 | 139-147 |
135-145 | 144-152 |
140-155 | 149-157 |
150-165 | 154-162 |
160-175 | 159-167 |
170+ | 160+ |
Once you have a general idea of the right length, consider how you like to ride and the type of terrain you plan to explore on your splitboard so you can decide if you should go longer or shorter. Here are some things to keep in mind:
- If you own a freeride or powder snowboard and like the way it rides, you will probably be happy on the same size splitboard.
- If you currently ride a freestyle board inbounds, you may want a splitboard that's a few centimeters longer for better performance in soft snow.
- A longer splitboard supports your body weight and that of your gear better than a shorter one for excellent flotation in soft snow. During ascents, the extra length provides better glide, thus better efficiency, when skinning.
- A shorter board is typically lighter weight than a longer one, which can benefit you on outings with lots of climbing.
- A shorter board is more maneuverable, making it easier to perform kick turns while skinning and to turn through tight trees on the descent.
- If you're buying one splitboard to do it all, from deep pow to spring corn snow, consider a mid-range length that will strike a balance between flotation and maneuverability.
There's a lot of personal preference in picking board length, so despite what you read or are told, if you know you like a longer or shorter board you can let that guide your choice.
Splitboard Camber and Rocker
If you've previously purchased a snowboard, you're probably familiar with snowboard profiles, such as camber, flat, rocker, camber/rocker and flat/rocker (you can learn more about these profiles in the How to Choose a Snowboard article and Camber Versus Rocker article). These same profiles exist with splitboards, but the majority of splitboards fall into one of these three options: camber, rocker or camber/rocker.
Choosing the right profile for you has a lot to do with the type of terrain you're riding, your riding style and personal preference.
Camber
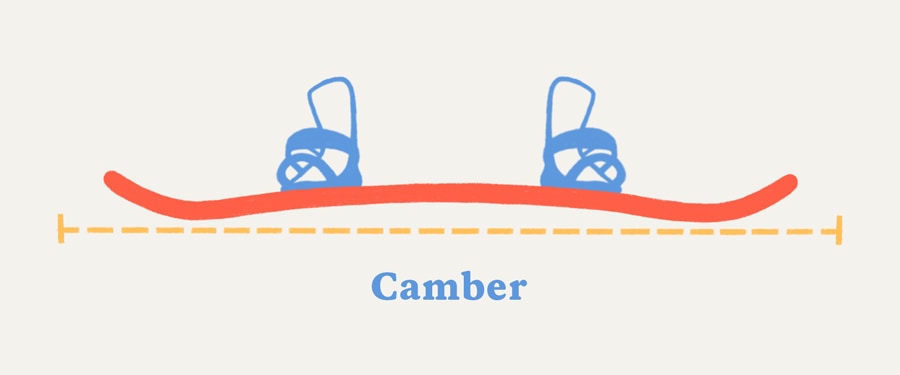
Camber is defined by the uplifted midsection of the board.
Pros:
- Good grip: Continuous edge contact provided by camber creates good edge hold, particularly on harder snow. This is noticeable both on the descent and while skinning uphill.
- Stability while turning: The good edge hold creates a stable feel while turning.
- Good control at high speeds: Cambered boards have a stable feel that allows them to handle fast, aggressive riding.
Cons:
- Less flotation in powder: Without the turned-up nose and tail of rockered boards, cambered boards generally don't float as well in deep, soft snow, both on the descent and ascent. That said, with good technique, a cambered board can be ridden in powder.
Rocker
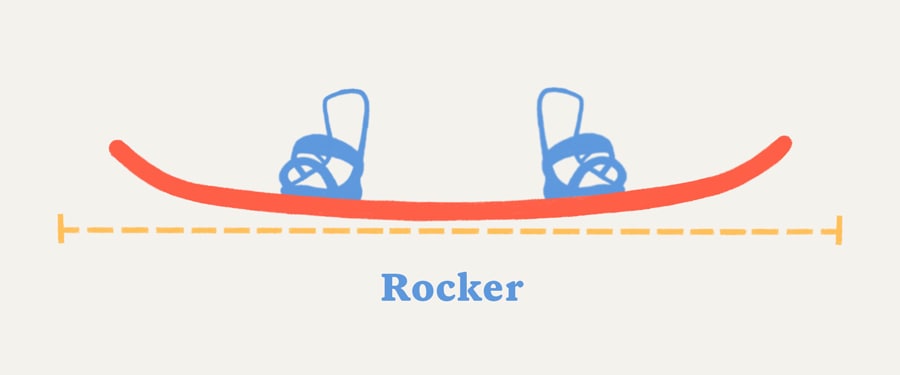
Take the opposite of camber and you've got rocker: It's a continuous arc that curves up from the center of the snowboard so that the nose and tail of the board rise off the surface of the snow.
Pros:
- Good flotation in soft snow: With a nose and tail that rise off the snow, a rockered snowboard helps keep you afloat in powder.
- Good maneuverability: Less edge contact allows easy, nimble turning.
Cons:
- Less edge control: The pro of good maneuverability comes with a cost; less edge contact means you may experience less control and grip on harder snow whether you're riding downhill or traversing a steep slope while skinning.
- Less grip while skinning: Many things affect grip while skinning, including your technique, climbing-skin quality and snow conditions, so a board's profile can't be all to blame if you're slipping. But, generally, a splitboard with rocker will enable less skin-to-snow contact compared with a board with camber because of how the nose and tail rise off the snow.
Camber/Rocker
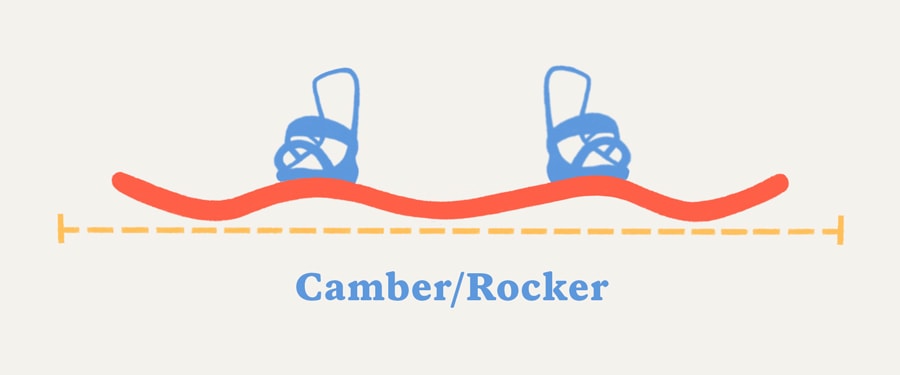
The majority of splitboards these days combine camber and rocker for a best-of-both-worlds scenario. Snowboard manufacturers have developed many variations of camber/rocker, but here are the typical attributes:
- Good flotation: Though not as pronounced as a fully rockered snowboard, rocker at the nose and tail of the snowboard allows the board to stay afloat in soft snow.
- Good edge control: Camber underfoot provides some of the edge-hold characteristics of a fully cambered board.
- Good grip while skinning: Camber under foot keeps good edge contact and skin-to-snow contact for reliable grip while skinning.
Splitboard Shape
Almost all splitboards are categorized as either directional or directional twin. An easy way to decide what to get is to look at the shape of your conventional snowboard—most backcountry riders will be happy with a splitboard that has a similar shape (i.e., if you ride a directional snowboard, you'll enjoy a directional splitboard). Here's more information about splitboard shapes to help you pick the right one for you:
- Directional: These boards typically have a longer nose and shorter tail, making them best for riding primarily in one direction. Their asymmetrical flex is generally stiffer in the tail for good carving and softer in the nose for good flotation. These characteristics make them great for high-speed carving and riding in powder.
- Directional twin: These boards are similar to true twin snowboards (those that are completely symmetrical in shape and flex), but they usually have a stance that is set slightly back, and the flex and shape profiles may vary from nose to tail. Directional twins are versatile boards for riding all over the mountain and in lots of different conditions. If you like riding a twin or directional twin standard snowboard and want that same freestyle feel in the backcountry, then a directional twin is likely a good choice.
- True twin: You're unlikely to find a completely symmetrical, true twin splitboard with a centered stance. If you like riding a true twin snowboard and want one for the backcountry, your best bet is to look for a directional twin splitboard that's designed to be ridden switch and has minimal stance setback.
Splitboard Width
Splitboards, like regular snowboards, come in different widths, and many times a single model is available in regular and wide versions. Choosing the right width has to do with how well your snowboard boots fit on the board. Just as with a traditional snowboard, the proper width allows the toes and heels of your boots to hang over the edges of the board just slightly (about 1-2 cm on each edge). This allows you to get good leverage while turning.
- If your board is too wide: You may not be able to get enough leverage to easily maneuver from one edge to the other.
- If your board is too narrow: Your toes and heels will overhang too much and you risk dragging them in the snow while turning, which could cause you to lose control.
This chart gives you an approximate waist width for men's and women's boot sizes:
Snowboard Waist Width (mm) | 235 - 245 mm | 245 - 255 mm | 255 - 260 mm | 260 - 265 mm+ |
US Men's Boot Size | 6.0 to 8.0 | 8.0 to 9.5 | 10 to 11.5 | 11.5+ |
US Women's Boot Size | <7.5 - 9.5 | 9.5 - 11 | 11.5+ | 13+ |
It's worth pointing out that there are a handful of splitboards that are quite a bit wider than the numbers you see above. For instance, some are upward of 320mm in the nose, 275mm in the waist and 300mm in the tail. These boards are designed to provide superb flotation in really deep powder. Because these powder-specific boards are so wide, snowboarders will typically ride a much shorter length than they would in a more traditional freeride board, so make sure to pay attention to the size chart information.
Additional Splitboard Features
Flex
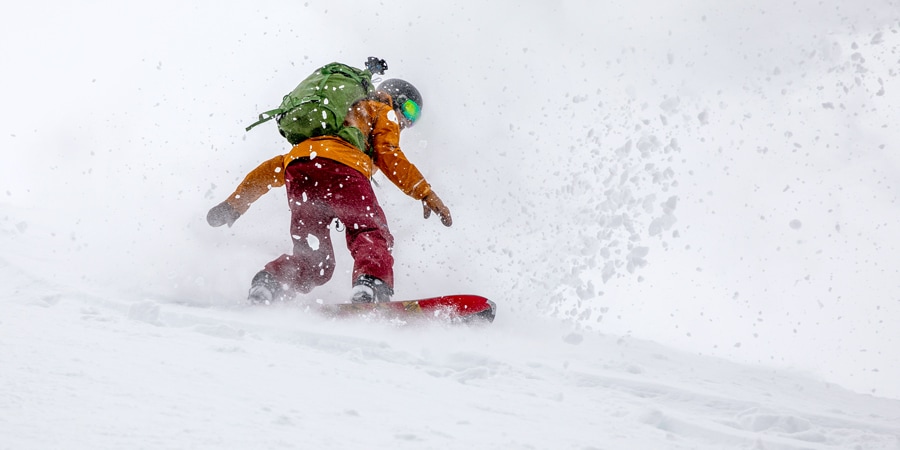
In general, splitboards are stiffer than their conventional snowboard counterparts; the added stiffness helps provide good control and edge hold on both the ascent and descent, and it supports the weight of all that extra backcountry gear you're carrying in a backpack.
That being said, there are still ranges of flex among splitboards. The key to getting the right flex for you is to pick a board that's made for the type of riding you like to do. For instance, if you like to ride fast and need a board with high-speed performance, you'll want one with a stiff flex. If you're more of an all-mountain snowboarder who rides in a wide variety of conditions and terrain, perhaps a board with a medium flex will be more versatile. If you like to make surfy turns and slash through powder, you may even look for a soft flex.
It's also worth noting that many splitboard makers vary the flex throughout the length of the board. For instance, a board may be stiffer near the tail for good edge hold and carving and softer near the nose for flotation in soft snow.
Topsheet Materials
The materials used in the topsheets of a splitboard influences the weight and stiffness of the board. Although manufacturers come up with many unique topsheet options, the two main choices are fiberglass and carbon.
- Fiberglass is commonly used as a topsheet material. It's affordable and able to be applied in different ways to achieve certain flex attributes. But fiberglass is heavier and less stiff than carbon.
- Carbon is featured in a handful of high-end splitboards to reduce weight and increase stiffness. The addition of carbon can dramatically up the price, so you'll want to think about whether you really need it. If you'll be doing a lot of long-distance tours with big elevation gain, the weight reduction of carbon may be worth the added expense.
Attachment Hardware
All splitboards have clips located at the nose and tail and along the center seam that help keep the two skis securely locked together when your splitboard is set up for snowboarding downhill. All clips do their job pretty well, so you don't necessarily have to give them much consideration when shopping. That said, the tighter the two halves of a splitboard are held together, the better, so some people look for specific clip designs. Here are some things you may want to think about:
- Some clips allow you to adjust their tension so you can eliminate any play that may develop over time. This ensures you can keep the two halves of the board pulled together tight.
- Some clips swivel out of the way so they won't get banged up or caught on something while you're skinning.
- Traditionally, board manufacturers have had to drill holes through the board to install the clips, leaving exposed bolt heads on the base. But some board makers are coming up with ways to avoid this, resulting in a smooth base for the best ride quality.
- If you decide you don't like the clips that came on your board, most clips are sold aftermarket and can be installed without much effort.
Skin Attachment Points
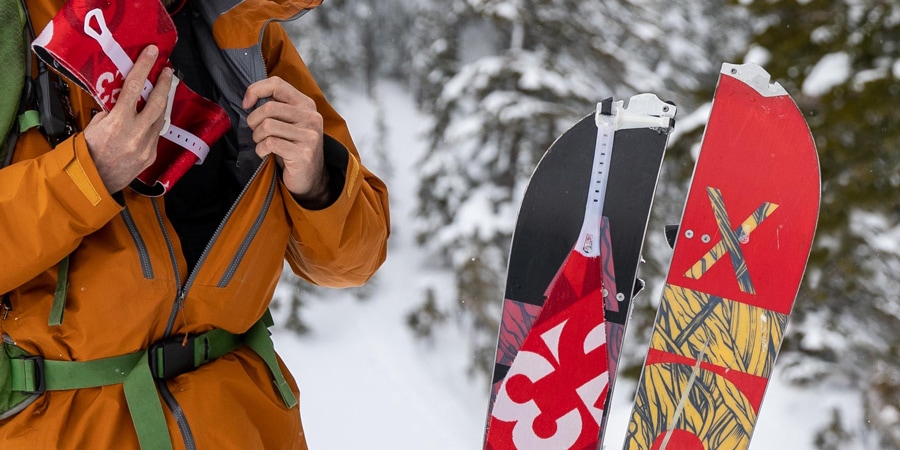
Some splitboards have dedicated attachment points for climbing skins to keep them securely in place. This doesn't need to be a top priority, as climbing skins have attachment systems that work with all splitboards, but it can be a nice feature if you're looking for a way to decide between one board and another.
Also, some boards also have precut skins available to save you the trouble of trimming them.
To learn more about skins for a splitboard, see our article How to Choose, Trim and Attach Splitboard Climbing Skins.
Tip and Tail Reinforcement
Heading into the backcountry means you'll have more opportunity for bumping up against trees, rocks and other obstacles while skinning and riding. Most splitboard makers recognize this and beef up their boards with durable topsheets and reinforcement in vulnerable areas, but it's worth looking at to make sure the board you buy will hold up.
One thing to specifically look for is nose and tail reinforcement. With your board split apart, the tips and tails of the splitboard skis are more at risk of being damaged. For this reason, many splitboard makers include metal at the nose and tail.
Binding Mounting System
There are two primary ways that bindings mount to a splitboard: inserts and channel mounts. Both are quality mounting methods. Here's some additional info to help you decide:
- Inserts: Most splitboards have predrilled inserts. They are simple and reliable, and they can accommodate all splitboard bindings on the market. Their standardized mounting pattern offers ample options for positioning bindings, allowing most backcountry riders to find the stance width and angles that work for them.
- Channel mounts: Some boards have a channel system instead of predrilled inserts. You can recognize this by the four slots running parallel to the board in the area where the bindings mount. Channels offer lots of options for really dialing in your stance, so if you have a unique stance that's very wide or has really high angles, you may want to consider a board with channels.
To learn more about splitboard binding options, see our article How to Choose Splitboard Bindings.
Backcountry travel has inherent risks. Before you head out on your first trip you must have a solid understanding of how to travel responsibly in the backcountry. Start by reading our article Beginner's Guide to Backcountry Skiing and Snowboarding, then sign up for an Avalanche Awareness class.
