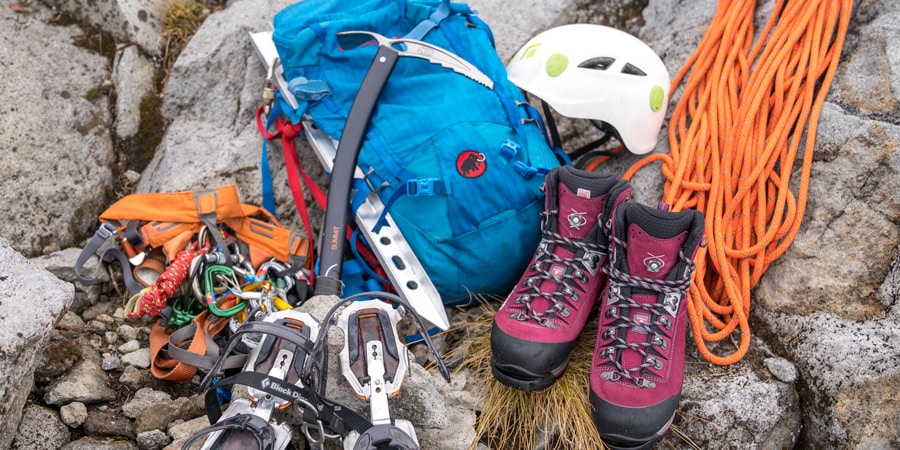
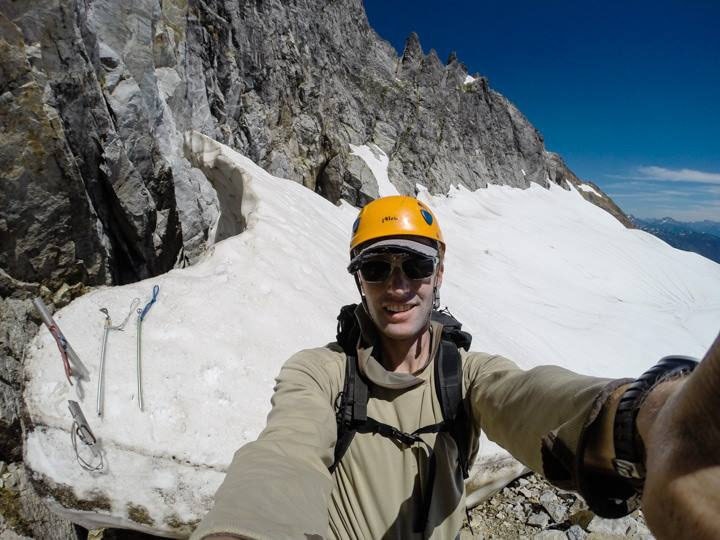
Having proper technical training and being in excellent physical shape are critical to a successful mountaineering experience. But, before you head out on your first mountaineering trip, you need to be sure you're equipped with the right gear and clothing. This article will focus on the gear; for clothing tips, see our article, What to Wear Mountaineering.
Here's the essential gear you'll need for most mountaineering trips:
- Mountaineering gear: Items such as mountaineering boots, crampons, a climbing helmet and an ice axe are standard items for almost every mountaineering climb. For trips that take you onto glaciers, you'll need a rope, harness and crevasse rescue equipment to protect against crevasse falls.
- Camping gear: For day trips, you'll need basic items like a backpack, headlamp, hydration system and the Ten Essentials. But, many mountaineering trips require at least a night or two of camping, in which case you'll need a tent, sleeping bag, sleeping pad and stove.
- Mountaineering accessories: Accessories like an altimeter watch and navigation tools can make travel in the mountains easier and more comfortable.
Note: These items are required on many mountaineering trips, but not all; the equipment you take along can vary depending on season, route selection and personal preference.
As you gain experience you'll figure out exactly what you need and what you don't, but for now, use the tips in this article and talk to other climbers about what they use.
And just because you see an item listed doesn't mean you have to rush out and buy it. If you're going on a guided trip, you'll find that gear like ropes and tents are often provided. For those things that aren't provided, you may be able to rent some of them from the guide service or a shop like REI.
Mountaineering Gear
The mountaineering gear that's required for your trip depends a lot on the route you're climbing. For instance, if you'll be crossing glaciers, you'll need a rope, harness and crevasse rescue equipment. But on unglaciated routes, you may be able to leave some or all these items behind. And if you're hiring a guide, certain things may be provided or available to rent, so check with them before purchasing. REI also rents gear and sells some used items.
Here are many of the common mountaineering-specific gear items required for a climb:
Mountaineering Boots
Don't underestimate the importance of a good pair of mountaineering boots. They'll provide traction and stability for traveling on rocky terrain, and the ability to attach crampons for climbing snow and glaciers. Your more-flexible backpacking boots may seem like a good option, but not all backpacking boots are compatible with crampons. Also, the flexibility of the soles can actually cause your feet to tire quickly when walking on uneven terrain. Stiff mountaineering boots provide a stable platform.
You have two basic choices when looking at mountaineering boots: insulated and non-insulated.
Insulated mountaineering boots: For climbs in frigid temperatures or those that feature a significant amount of time spent on snow and/or glaciers, mountaineers wear insulated mountaineering boots. If conditions or personal preference call for them, they can be worn any time of year, but they're commonly worn in winter, early season (May/June) and late season (September).
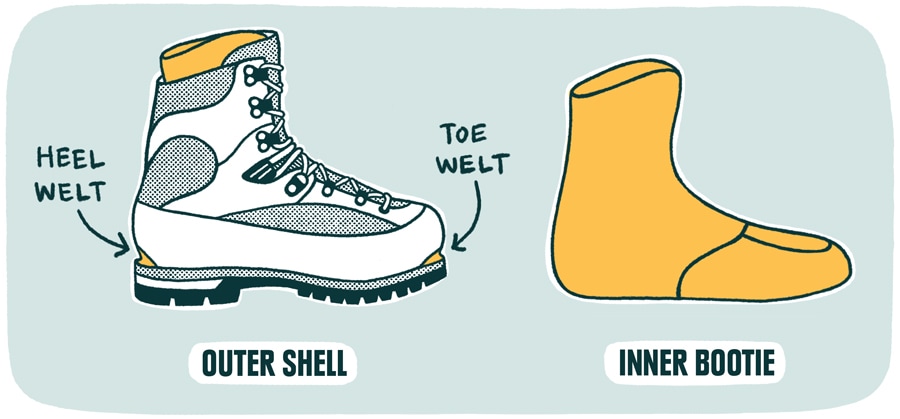
The warmest insulated mountaineering boots have a two-part design (which is why some people call them double boots): inner booties that provide insulation and outer waterproof shells with soles on them. Traditionally the outer shells have been made from plastic, but more and more options are available with flexible synthetic materials that are more comfortable. These tend to be the choice for winter ascents in the contiguous U.S. or climbs on bigger peaks, like Denali.
Insulated boots without removable booties typically don't have as much insulation, but are often plenty warm enough for early-season and late-season climbs in the contiguous U.S.
Non-insulated mountaineering boots: For climbs in more mild temperatures or those that don't require much time on snow or glaciers, non-insulated mountaineering boots are a common choice. They are typically less bulky and lighter than insulated boots, making them more comfortable and agile. It's common for mountaineers to wear non-insulated boots during mid-season (July/August) climbs.
Learn more about the importance of selecting the right boots in our Hiking Boots: How to Choose article, then check out our selection of mountaineering boots.
Crampons for Mountaineering
Steel crampons are strong and durable, making them a common choice for general mountaineering. Aluminum crampons are much lighter than steel but also less durable. If your climb will be mostly on moderate snow slopes, aluminum crampons will be sufficient. However, if your route takes you over rock and snow or the steepness requires front pointing, steel crampons are recommended.
Binding types: Crampons attach to boots using one of three binding types: strap-on, step-in or hybrid.
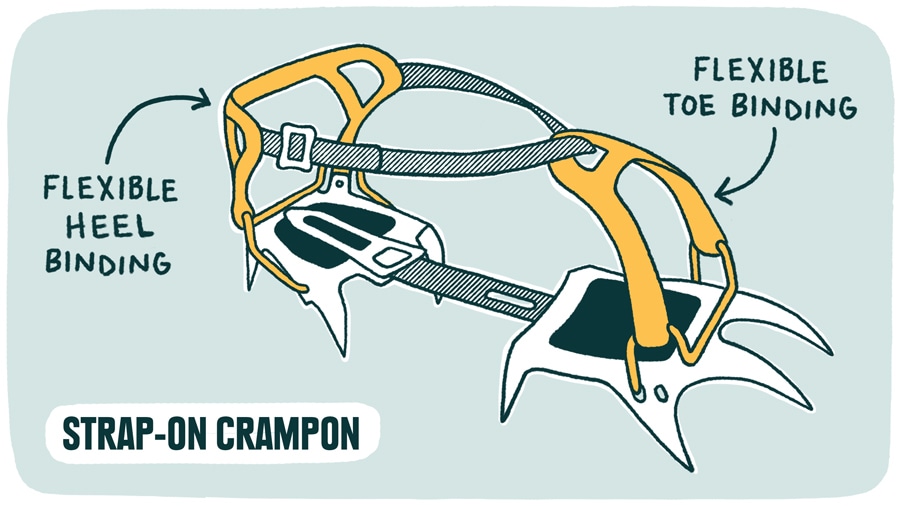
Strap-on crampons feature nylon webbing straps and flexible toe and heel bindings that attach to nearly any mountaineering boots.
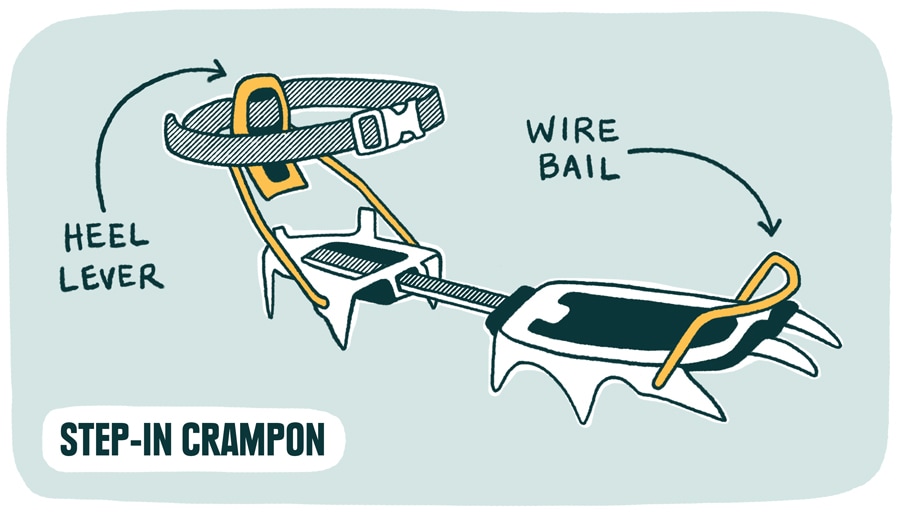
Step-in crampons have wire bails in the front and heel levers in back that attach to boots, creating a very secure system. To use step-in crampons, your boots need to have at least 3/8" welts or grooves on the toes and heels.
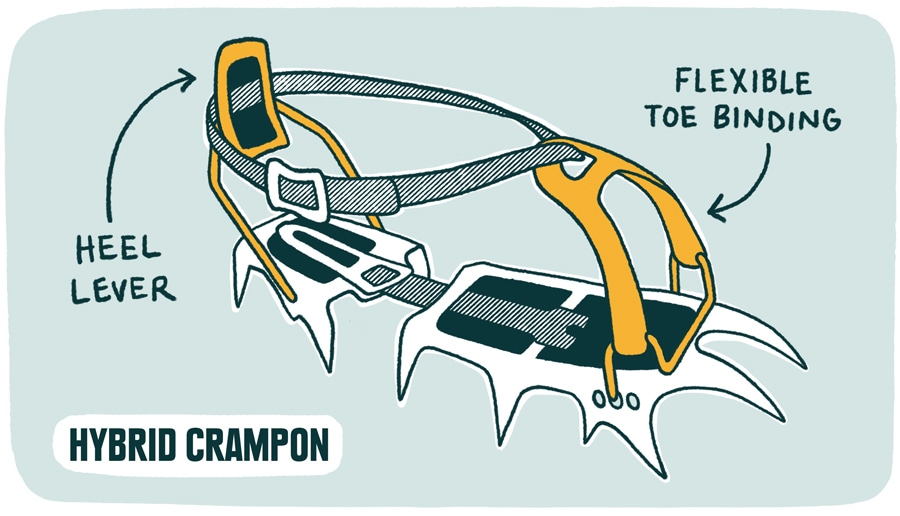
Hybrid crampons have heel levers that require boots with rear welts or grooves. The toes attach with straps and flexible toe bindings that fit most boots with or without toe welts.
For more on crampons, see our Crampons: How to Choose article and look at our assortment on REI.com. And to learn more about using crampons, see our How to Use Crampons article.
Climbing Helmets for Mountaineering
Most standard rock-climbing helmets are suitable for mountaineering. Make sure your helmet has clips for attaching a headlamp. Some helmets have closable vents, which can be nice on cold days.
Read more about climbing helmets in our Climbing Helmet: How to Choose article, then check out our selection of climbing helmets.
Ice Axes for Mountaineering
When choosing an ice axe, you'll need to consider your size and activity when comparing the lengths, weights and shapes of the axes. For general mountaineering, most climbers choose an axe with a fairly straight shaft made of aluminum and a head and spike made of steel.
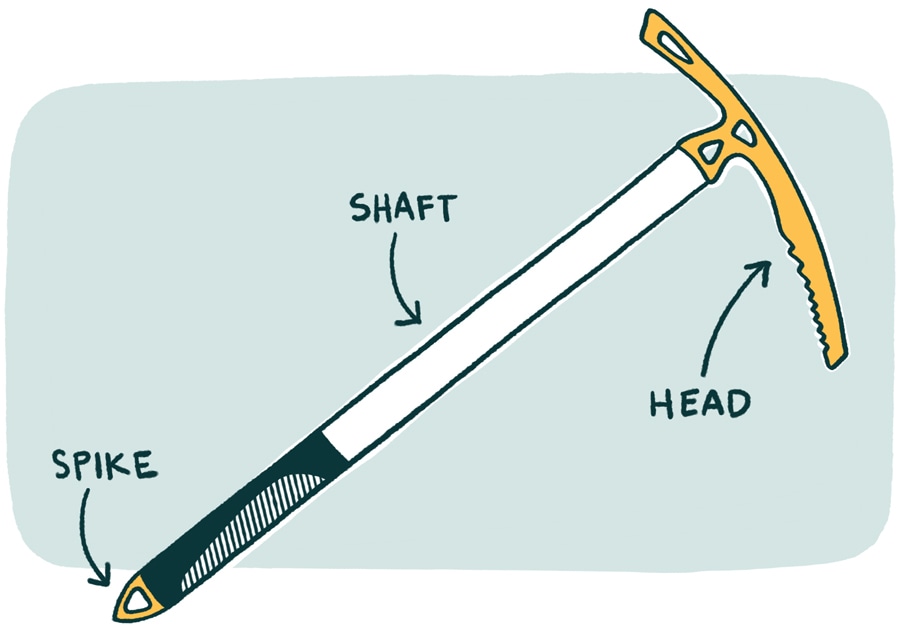
One popular way to find the correct length of an axe is simply to hold an axe at your side with your hand around the head and the shaft pointing down toward the ground while standing relaxed. The spike of the axe should reach your ankle bone when you stand fully upright with your arms at your sides.
To learn more about finding the right axe, read our Ice Axes: How to Choose article. To learn more about using an ice axe, read How to Use an Ice Axe for Mountaineering. To shop for ice axes, take a look at our selection.
Ropes for Mountaineering
If your mountaineering trip will involve glacier crossings or technical rock climbing, then you're going to need a rope. If you're hiring a guide service, ropes are generally provided. But if you're choosing your own ropes for mountaineering, you'll want to look closely at the weight because a lighter rope is less of a burden to carry during a long approach hike. The weight of a rope is largely determined by the diameter and length:
Diameter: Often times, the skinnier the rope is, the lighter it will be. The good news is that ropes rated as single ropes continue to get skinnier and skinnier; it's now possible to get a single rope that is about 8.5mm in diameter.
Length: For many mountaineering climbs, you may be able to use a rope that's shorter than the standard rope length of 60m, thereby reducing weight. When determining the length of rope you need, you must consider things like how far apart the climbers on your climbing team will tie into the rope and how much rope you need to perform a rescue.
You can learn more about using a rope for glacier travel in our article, Glacier and Roped Travel for Mountaineering.
Dry treatment: Because you'll be traveling on snow as you traverse glaciers, we recommend you choose a climbing rope with a dry treatment that resists water absorption. When a rope absorbs water, it not only gets heavier, but it's also less able to withstand the forces generated in a fall. Wet ropes can also freeze, which makes them slippery, stiff and difficult to work with. Dry ropes can have a dry core, a dry sheath or both. Ropes with both offer the greatest moisture protection.
To learn more about different types of climbing ropes, see our Climbing Ropes: How to Choose article. Head here to see what ropes we carry.
Climbing Harnesses for Mountaineering
A standard rock-climbing harness can be used while mountaineering, but one designed specifically for mountaineering will be more comfortable and convenient.
A harness designed for mountaineering is often made from flat webbing and features low-profile gear loops to keep the harness lightweight, compact and comfortable while wearing a pack.
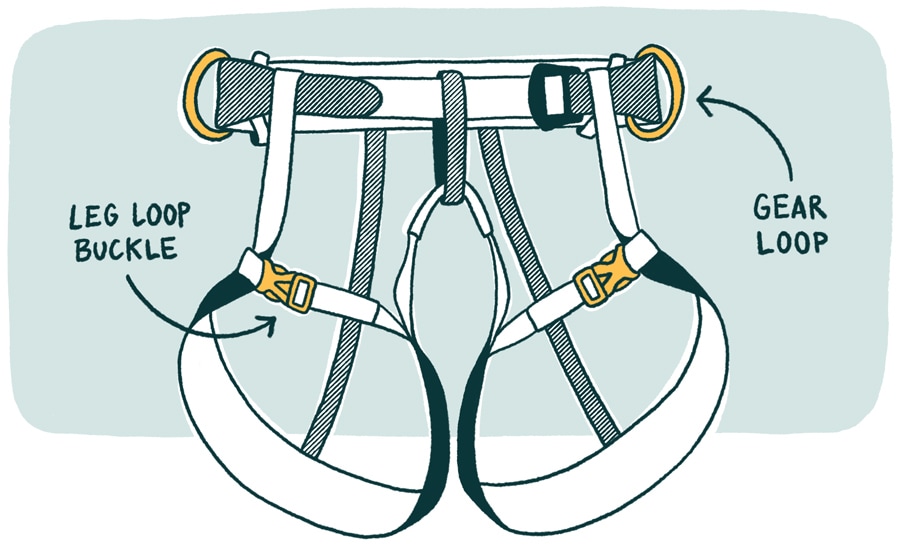
And unlike standard rock climbing harnesses, mountaineering harnesses typically feature leg loops that unbuckle so you can put the harness on or take it off while wearing skis or crampons.
Learn more about climbing harnesses in our article Climbing Harnesses: How to Choose.
Crevasse Rescue Equipment for Mountaineering
If your trip will take you onto a glacier, then it's essential to carry crevasse rescue equipment so you'll be prepared if you or one of your climbing teammates falls into a crevasse.
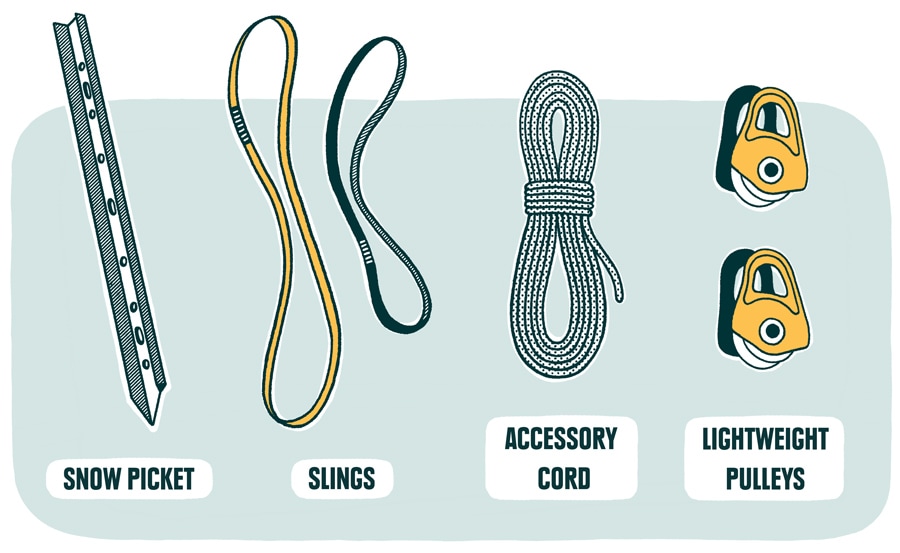
Many climbers build their own basic crevasse rescue kits that typically include:
- 1 snow picket
- 1 single-length sling
- 1 double-length sling
- 20 ft. of 5-7mm accessory cord for making prusik slings
- 2 lightweight pulleys
This gear can be used to haul a fallen climber out of a crevasse. Knowing how to set up a hauling system correctly and quickly is essential, so seek out expert instruction if you're new to mountaineering.
Learn more in our Crevasse Rescue Skills article.
Carabiners for Mountaineering
You'll need a mix of locking and nonlocking carabiners for building anchors and crevasse rescue hauling systems. The exact quantity needed will vary depending on where you're going, but a good starting point includes 4 pear-shaped locking carabiners and 5 oval-shaped non-locking carabiners.
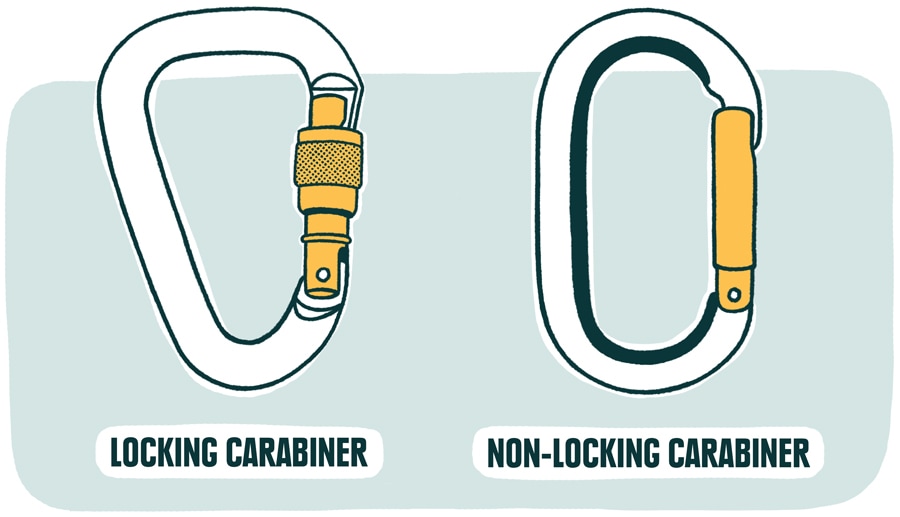
Read our Carabiners: How to Choose article to learn more about carabiners.
Camping Gear for Mountaineering
Mountaineering climbs often require some of the same gear you take backpacking, such as a backpack, tent, sleeping bag and stove. If you're out for a day trip, then you may be able to leave certain items behind.
Here are the common camping items required for mountaineering:
Backpacks for Mountaineering
While you may be able to use your backpacking pack for mountaineering, there are specific features on mountaineering packs that make them ideal for climbing peaks.
Most mountaineering packs (also called climbing packs) have a narrower, sleeker profile to allow unencumbered arm movement while you're scrambling, climbing and handling ropes. Many of them also allow you to strip down the pack by removing the lid, framesheet and possibly the hipbelt to reduce the weight and size for summit attempts.
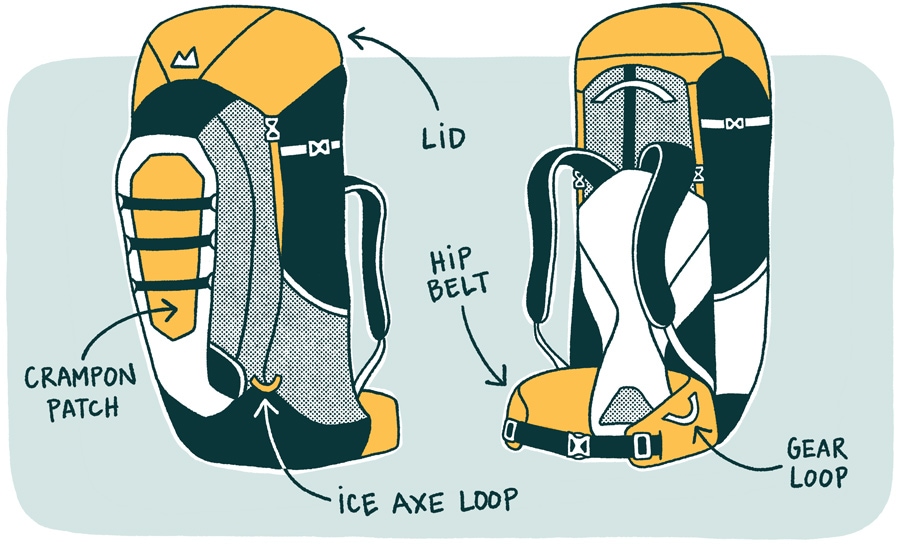
Mountaineering packs include ice axe loops for attaching one or two axes, and many of them have gear loops for clipping on extra gear, and a reinforced crampon patch that prevents crampon points from tearing holes in the pack.
Tip: Bring a couple heavy-duty trash bags along. You can use them as a pack liner and pack cover to keep your gear dry in a rainstorm and to protect your pants while you're glissading down snowfields.
Learn more about backpacks in our article Backpacks: How to Choose.
Tents for Mountaineering
For mountaineering climbs that will take longer than a single day, as many do, you'll need a shelter to sleep in. Some climbers choose lightweight bivy sacks, but it's more common to use a 4-season tent. In certain cases, your 3-season backpacking tent will work fine, but a 4-season tent is engineered to withstand fierce winds and substantial snow loads, which you can encounter any time of year on some mountains.
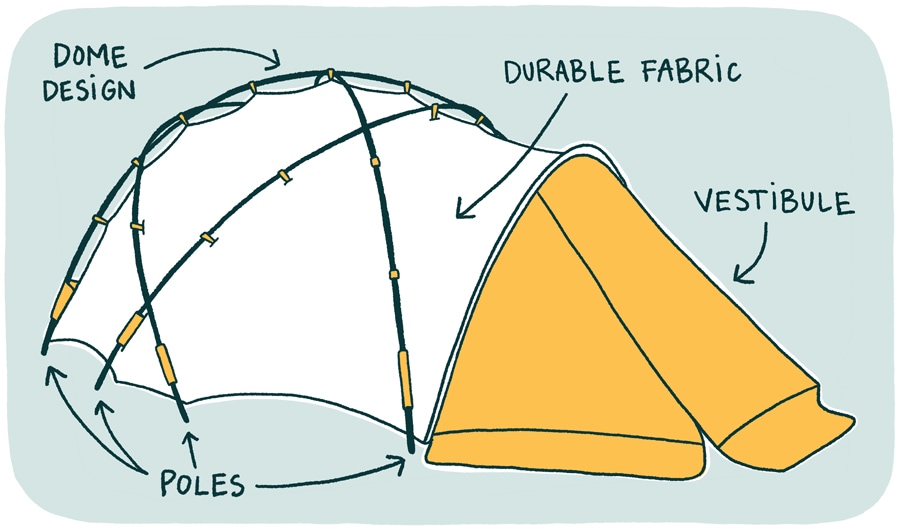
To withstand seriously inhospitable weather, 4-season tents use more poles and more-durable fabrics than 3-season tents. Their rounded dome designs eliminate flat roof spaces where snow can collect. They offer few mesh panels and rainflies that extend close to the ground. This hinders ventilation and can make them feel warm and stuffy in mild weather. But when foul winds begin to howl, a 4-season tent provides a reassuring place of refuge. Many 4-season tents include vestibules that give you a sheltered place to stow gear and change out of wet, dirty clothing before getting into the dry tent.
Learn more about tents in our Backpacking Tents: How to Choose article.
Sleeping Bags for Mountaineering
For overnight climbing trips from May to September in the contiguous U.S., a sleeping bag rated to keep you comfortable from 0°F-20°F will typically be sufficient. If you're traveling to Alaska or plan on doing any winter mountaineering, you'll want a bag rated to -20°F or possibly even colder.
Learn about sleeping bag ratings and more in our Sleeping Bags for Backpacking: How to Choose article.
Sleeping Pads for Mountaineering
Although it can be bulky, a foam pad eliminates any worry of punctures when you're spending the night out on a mountain. If you take any type of air pad, be sure to carry a repair kit. Some climbers use an air pad on top of a foam pad for better insulation and for the peace of mind of having a foam pad in case your air pad pops.
Whatever sleeping pad system you choose, shoot for an R-value (or equivalent) of at least 3. R-value is a measure of a sleeping pad's thermal resistance to conductive heat flow.
The higher a pad's R-value, the better you can expect it to insulate you from cold surfaces.
Read more about sleeping pads in our Sleeping Pads: How to Choose article.
Headlamps for Mountaineering
Whether you're out for a single day or several, a headlamp is a must-have. Most summit attempts involve a pre-dawn start, so you'll need a bright, reliable headlamp to help you navigate through the darkness. Look for an LED headlamp that has both flood and spot beams, and outputs 100 lumens or more for sufficient light. Always carry an extra set of batteries and consider using lithium batteries as they withstand cold temperatures better than alkaline.
Learn more about headlamps in our article Headlamps: How to Choose.
Stoves for Mountaineering
When narrowing down the selection of backpacking stoves, you'll need to decide between a liquid-fuel stove and a canister-fuel stove.
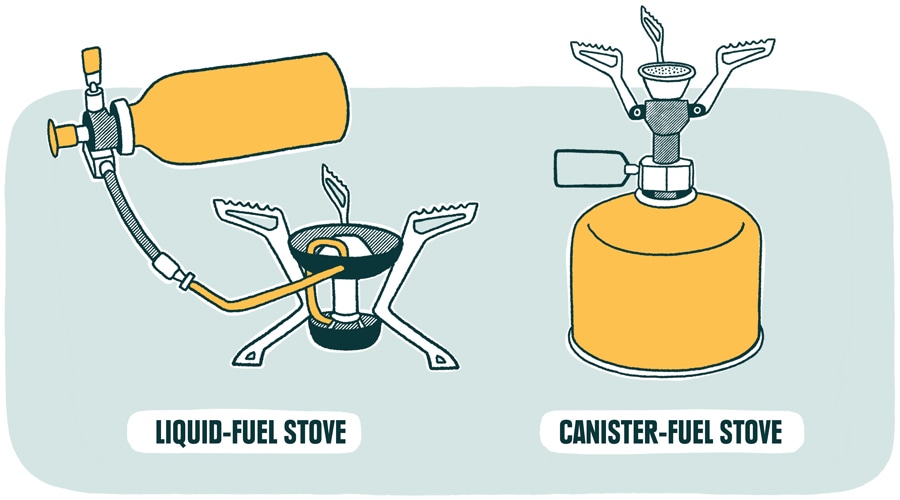
Weight and temperature are two primary considerations when choosing. Here's why:
Weight considerations: By design, canister-fuel stoves will always be lighter than liquid-fuel stoves. However, lots of fuel canisters can add up and offset the weight savings compared to a liquid-fuel stove with a refillable fuel bottle.
So, for trips longer than a few days or ones where you plan to run the stove a lot, consider a liquid-fuel stove. (For short one- or two-day trips, a canister stove will probably be fine.)
Outside temperature considerations: Liquid-fuel stoves run better than canister-fuel stoves in cold temperatures, which you will often encounter while mountaineering. Cold temperatures lower the pressure in the fuel canister, which significantly reduces the performance of the stove. Some canister stoves have pressure regulators to combat this.
Keeping the fuel canisters warm in your sleeping bag or jacket pocket can also help improve performance. But, for mountaineering trips with consistently cold temperatures, it's recommended to go with a liquid-fuel stove.
To learn more about stoves, read our Backpacking Stoves: How to Choose article.
Hydration Systems for Mountaineering
Either use two hard plastic, wide-mouth water bottles or one bottle and a hydration reservoir. Bottles are nearly indestructible and generally easier to fill, so we recommend you bring at least one along.
If you use a hydration reservoir, be aware that the reservoir tube can freeze in cold temperatures, cutting off your water supply. You might consider buying an insulating sleeve that will help prevent freezing.
Water Treatment
When you're camped high on a mountain, you'll likely need to melt snow with a stove to make drinking water. You'll need to either boil the water for three minutes or filter it before drinking. If you don't want to boil your water so you can save fuel, other good options for making the water potable include pump filters, ultraviolet purifiers or water treatment tablets.
Since you'll likely experience very cold temperatures, consider a filter that doesn't use hollow-fiber technology because these can be damaged by freezing temperatures and drops.
To learn more about water filters, read our Water Treatment: How to Choose a Water Filter article.
The Ten Essentials
Even if your climb will only take a day, it's wise to carry the Ten Essentials every time you step into the backcountry. With these essentials, such as items for navigation, first aid, shelter and fire, you'll be prepared in case something goes wrong. Learn more about the Ten Essentials.
Accessories for Mountaineering
These accessories for mountaineering can make your trip go a little smoother and keep you comfortable along the way.
Altimeter Watches for Mountaineering
An altimeter watch is a helpful navigation instrument, especially in low visibility. Altimeter watches use barometric pressure to approximate your altitude so you can figure out where you are on the mountain. Readings are more accurate if you periodically enter a known altitude.
Navigation Tools for Mountaineering
When mountaineering, you won't always be traveling on a well-trodden trail, and a whiteout high on a mountain can be so disorienting that you won't be able to tell up from down. Before you start your climb, think about what tools you need to help you find your way.
- Map and compass: Two absolute necessities for every climb, a paper map and compass will be all some competent climbers need to navigate. Learn more in our articles How to Read a Topo Map and How to Use a Compass.
- GPS: For many adventures, though, a GPS is the go-to tool for navigating. The cold temperatures you may encounter high on a mountain can reduce the life of batteries, though, so make sure to start with fully charged batteries, bring backups and try to keep your device warm by stashing it in a pocket when it's not in use. Learn more in our article How to Choose and Use a GPS.
- Personal locator beacon (PLB)/satellite messengers: Designed primarily for use in case of an emergency, a PLB or satellite messenger can send an SOS alert to rescuers. But, some satellite messengers can also be used for navigation by tracking your route, providing access to digital topo maps and tracking altitude and barometric pressure. Learn more in our article How to Choose Between a PLB and Satellite Messenger.
- Smartphone: Mapping apps on your phone can allow you to navigate via GPS even when you don't have cell service. (You'll need to pre-download maps when you do have cell service or access to Wi-Fi.) This an option more and more adventurers are choosing because of their familiarity with smartphones and the availability of high-performance mapping apps. But, you need to consider how you will protect your phone from the elements and how you will recharge the batteries.
- Wands: Wands are a low-tech navigation solution. Made from bamboo sticks and colorful flagging, wands are akin to a trail of breadcrumbs; you stick them into the snow at regular intervals on your way up the mountain so you can follow them back down if you lose visibility. Wands can also be used to mark hazards, like a sagging snow bridge.
Climbing safety is your responsibility. No article or video can replace qualified instruction and experience.
