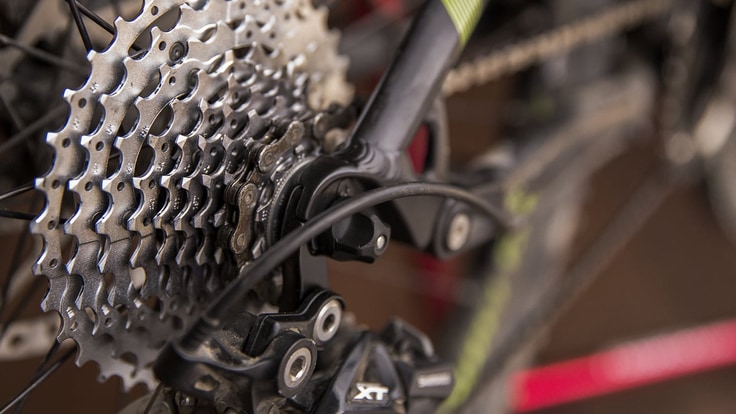
Once you've ridden about 1,000 miles on your bike, it's time to take a close look at your cassette. (The amount of wear will vary greatly depending on the condition of your chain and where you ride - mountain vs. road, for example.) If the teeth in your most-frequently used cogs look more like shark fins than the rounded humps of your little-used cogs, it's time to replace the cassette.
Sometimes it's possible to replace individual cogs instead of the whole cassette, but not all cassettes have replacement parts, and it's often better to replace the entire thing. Ask your local bike mechanic what's best for your bike.
Video: How to Replace a Cassette
Check Your Bike's Hub Type
The following steps for removing your cassette assume that you have a cassette freehub. Most modern bikes have this style hub. To check your hub type, remove your rear wheel from the bike and look near the smallest cog on the cassette. If you see a lockring sitting outside the smallest cog (it will typically be marked with the word "lock"), then you have a cassette freehub.
Video: What do Bike Cassette Sizes Mean?
Tools for Changing a Bike Cassette
The lockring is designed to hold the cogs of the cassette in place on the hub. In order to remove and replace your cassette, you need to unscrew this lockring. You'll need three tools to do this: a chain whip, a cassette lockring remover and a large adjustable crescent wrench.

Removing a Bike Cassette
After you have removed the rear wheel from your bike, remove the quick release skewer from the wheel. Then, insert the cassette lockring remover into your cassette and turn it until it seats; it will only seat in one position. If a standard cassette lockring remover doesn't fit your cassette, ask a bike tech for one that will.
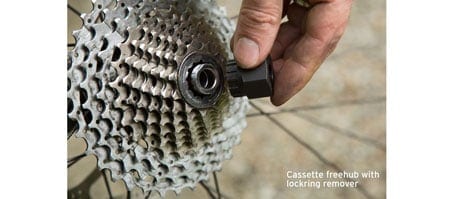
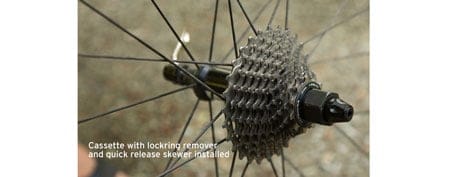
To hold the lockring remover snug to the cogs, remove the springs from your quick release skewer and then reinsert the skewer back through the wheel and the cassette lockring remover and tighten.
(If your bike has a thru axle that screws into the bike frame, rather than a standard quick-release, you can thread the axle through the lockring remover. This will keep all the pieces of the cassette in order when you remove the cassette, but it won't allow you to lock the pieces of the cassette together with the lockring remover.)
Stand behind the wheel (with the wheel vertical and the tire on the ground), and drape the chain whip over one of the larger cogs in the cassette so you can hold the handle with your left hand. Adjust your large wrench to fit the outside of the lockring remover, and hold it with your right hand. The chain whip will prevent the cassette from spinning while you use the wrench to unscrew the cassette lockring.
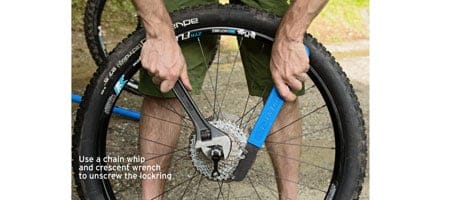
Press the wrench and the chain whip handles in opposite directions. Once the lockring is loose, release the chain whip and the wrench, and continue to unscrew the ring by twisting the lockring remover by hand or with the crescent wrench.
Remove the lockring and then slide the cassette off. Remove the cassette carefully if you intend to reuse any parts or pieces—the cogs and spacers sometimes come apart.
Installing a Bike Cassette
Slide the new cassette onto the freehub body. (When you buy your new cassette, make sure it's a compatible brand with your bike's hub.) There are grooves in the cassette that line up with ridges on the freehub, so the cassette will only go on in one orientation. The shaped side of the cog teeth should be facing away from the bike, and the size markings will almost always face outward.
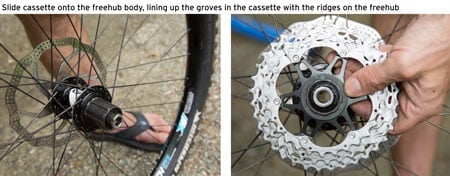
Make sure that each cog in your cassette either has a built-in spacer, or that you place a spacer between every cog (spacers come with a new cassette). Once you have the cassette assembled, look at the cogs to make sure all appear to be spaced the same.
When all the cogs and spacers are on, check that the smallest cog stands slightly proud of the freehub body; if it doesn't, you may have missed a spacer.
Now, rethread the lockring using the lockring remover tool, and turn the lockring tool clockwise with an adjustable wrench to tighten (but be careful not to overtighten). Then, if you have a torque wrench and the correct adapter, tighten to the manufacturer's specifications (if not, go to your local bike shop and have them do this part for you).
Replace the quick release skewer with the small part of the conical springs facing inward. Reinstall the wheel on your bike and shift through the gears to make sure everything works correctly before riding.
Bike Cassette and Chain Maintenance
Thoroughly clean your cassette at least a couple times per year. Take care when cleaning around the hub. Don't hose the hub down or use solvent to clean it as you may dissolve grease in the bearings. See our article, Bike Maintenance Basics, for more tips.
It's also a good idea to replace your chain when you change your cassette. (Chains wear faster than your cassette, so it's likely you'll go through a couple chains before you need to replace your cassette.) Cassettes and chains need to be compatible with each other. For example, if you have a 9-speed cassette, you need a 9-speed chain.
Poor chain condition can wear down your cassette teeth faster than usual. If you live near the beach where sand can get into your drivetrain, or if you live in a wet environment where your chain gets rusty, it's wise to proactively replace your chain. For how-to details, read our article, How to Change Your Bike Chain.
