There is no more effective way to improve at rock climbing than to have your own home bouldering wall. A wall simulates the demands of rock climbing and lets you work on technique while you're getting stronger. Bouldering is a fantastic full-body workout, but more importantly, it's a lot of fun.
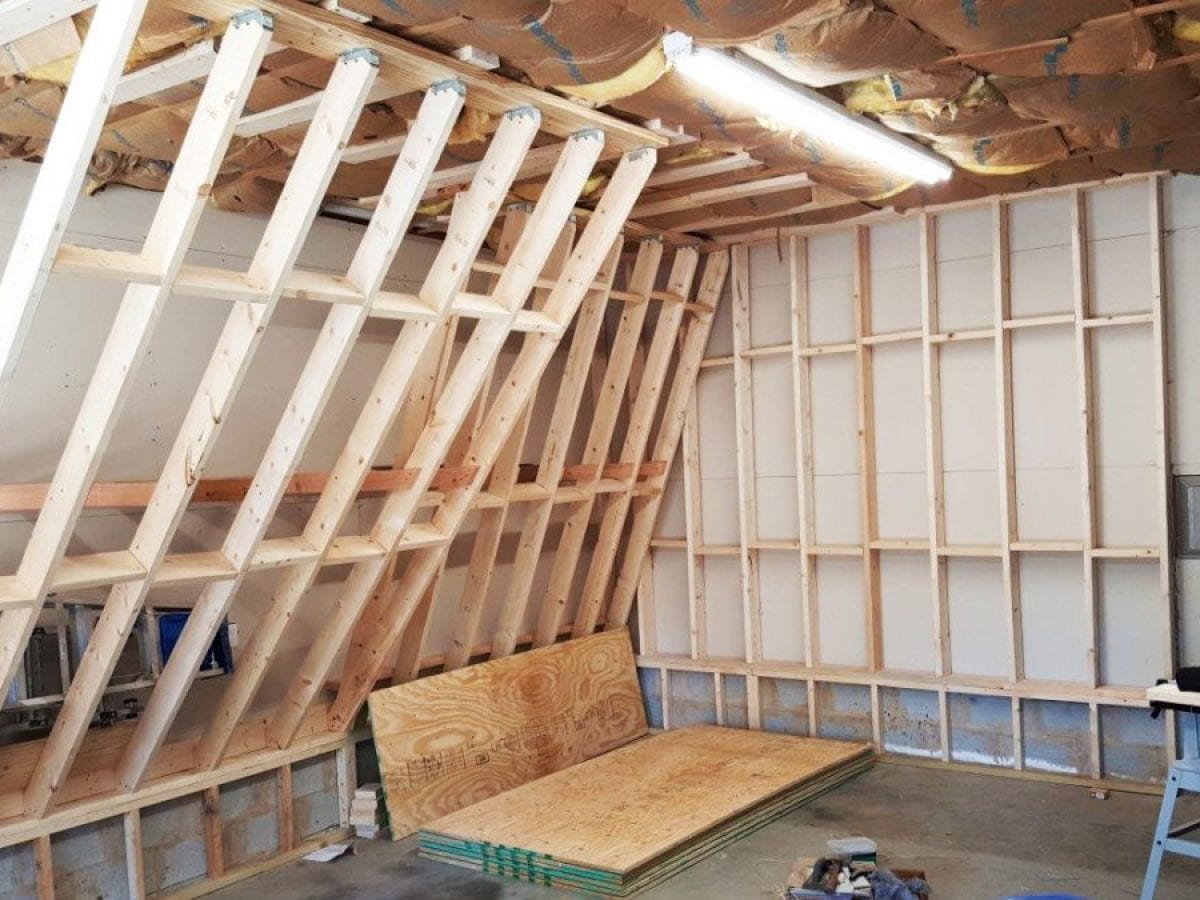
A bouldering wall is constructed in much the same way as a wood framed house: The individual walls are formed from a lumber framework attached to an existing structure (e.g. your garage wall) or supported by its own structure, then the framework is sheeted with plywood, creating the climbing surface.
If you're familiar with basic construction techniques, building your own wall will be a snap. However, if you don't feel comfortable running a circular saw, or you just don't have the time or inclination to let the sawdust fly, this booklet will give you all the information you need to design and plan your dream wall. Then you can hire a carpenter to handle the actual construction.
Download here: How to Build a Home Buildering Wall
In this article, we'll cover how to:
Design Your Climbing Wall
If you don't have much experience climbing on indoor walls, try to visit as many different climbing gyms and home walls as you can before designing your own wall. Try to record some basic measurements from the walls you like. The more experience you have on other walls, the easier it will be to design your own.
Evaluate Your Space
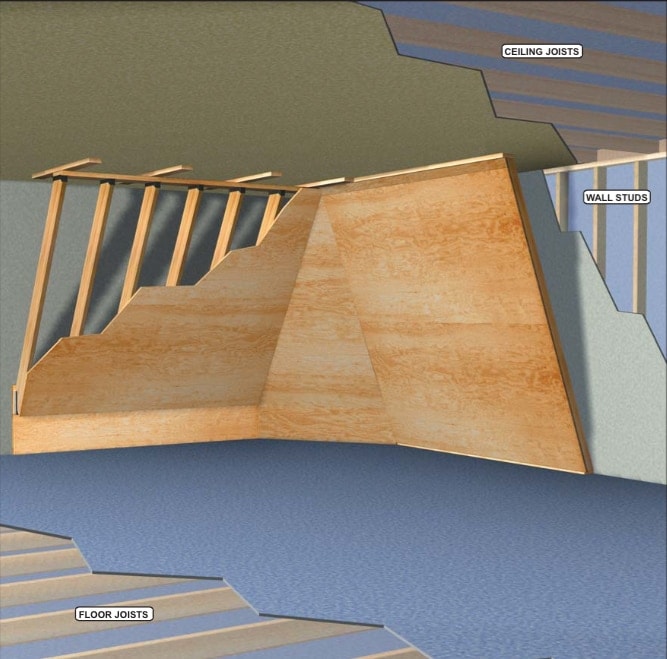
Look at the space you have available to build your wall and decide how to use it most efficiently. Make sure you consider what else the space may need to be used for. If it's a garage, do you need to leave room to park the car? Is it also a storage area? You can design and position the angles of your wall to fit over and around a parked car or you can build shelves into the backside of your wall for storage. If the wall is indoors, you'll want to maintain access to electrical outlets and to the back of the wall to make any necessary repairs to the T-nuts once it is finished. Also, consider lighting, ventilation, and access at this point. If you have to cover up windows or doors to build your wall, you'll need to find alternate lighting, ventilation and access sources.
When choosing your space, remember that falling is noisy and chalk gets everywhere. If it's indoors, try to isolate it as much as possible from your living space, especially if you share your dwelling with others. If you're considering an outdoor wall, remember that you'll have to weatherproof it somehow, and no matter what you do, the holds won't last as long as they would inside.
Decide How You Will Support Your Wall
Attaching your wall to an existing structure will eliminate some support braces, and be easier to design and construct, but will lock you into that location. The existing structure becomes part of your design. You must also ensure that the existing structure is strong enough to support the additional stresses the bouldering wall will add to it.
Note: Bouldering walls are very heavy. The structure that supports the wall must be strong enough to support the dead load (the weight of the wall itself) and live loads (the climbers). The dead load alone will come to several hundred pounds. Live loads vary not only by the weight of the climbers, but also by the momentary forces caused by the climbing moves. These forces can be several times the weight of the climber. The support system, whether a pre-existing structure or one built specifically for the bouldering wall, must be capable of supporting the maximum combined stresses. Consult an engineer, and be absolutely certain that your structure will support the loads that will be imposed on it.
A free-standing bouldering wall will not damage an existing structure and it will be easier to transport if you need to move. A free-standing wall is best if you are renting or do not have a suitable pre-existing structure to anchor into. Constructing a free-standing wall will cost more than a fixed wall and will be more difficult to design. You must take on the additional responsibility of engineering a support structure. All the stiffness inherent in attaching the wall to a rigid structure will be lost. You must compensate by using wider framing materials and additional bracing.
Visualize The Wall
Now that you understand the space you're working with, try to visualize the basic shape that you want your wall to take. Imagine what different shapes, sizes, and angles would look like in place. Make several rough sketches of different ideas to see how it will all fit together.
Once you have decided on the climbing wall's shape, location, and orientation, build a scale model with cardboard or foam board.
When choosing your wall shape, consider that certain shapes and angles tend to produce similar moves and limit variety. Horizontal roofs and vertical walls are notorious for feeling the same no matter what kind of hold or move you try to put on them. Curves and complex shapes can also lead to stiflingly homogenous climbing if you're not careful. These kinds of features look interesting when they're new, but get boring quickly. Flat, overhanging walls of between 20° and 45° seem to allow for the best variety of moves.
Think of your wall as a series of 8-foot-wide modules. According to how much space you have available, identify 1 or more basic wall shapes that you want to include in your design. Basing these modules on 8′ widths (1 full sheet of plywood) will make construction much easier and ensure good material yield, keeping the costs down.
Play around, arranging these primary walls in a variety of different configurations until you're satisfied with the result. When positioning your walls, remember to leave enough room to fall from any given point without hitting another wall.
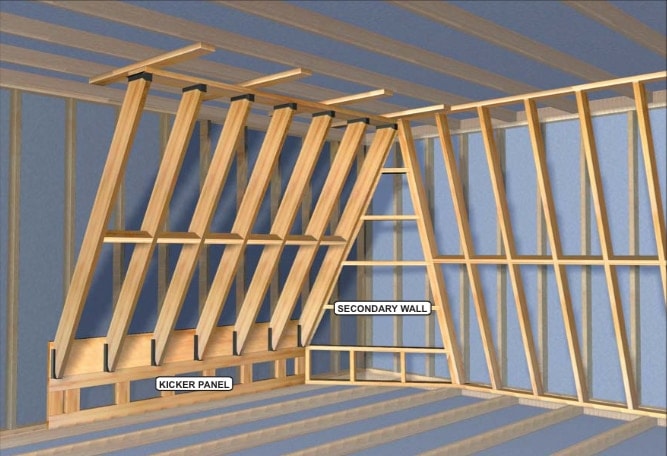
For any walls steeper than 20° or 30°, plan to have a short, vertical kicker panel at the bottom to provide ample room for your feet at the start of problems.
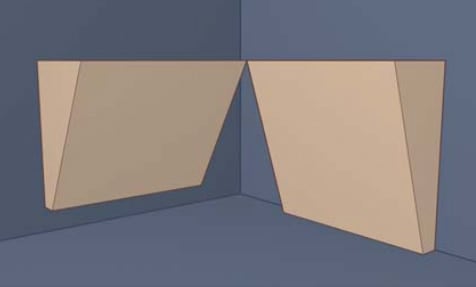
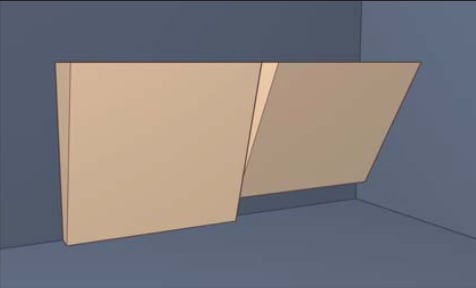
Now design secondary walls (or panels) to fill the space between the primary walls and tie them together into a seamless climbing structure. If your primary walls abut, you can simply make triangular panels to form 90° corners between them. If primary walls face each other, turn corners, or bridge doors, windows, or other structures, the secondary walls may need to be more complex in shape.
Lay It Out
Transfer your model's dimensions to a drawing, then use string and tacks, or tape, to mark the positions of all the design elements, full-size, in your actual space. Hang a plumb line from the ceiling to mark the border of each wall. Allow for the width of the anchoring structure, thickness of the wall studs and thickness of plywood sheathing. Verify that everything fits. Double check that all potential falls or swings will be clear, and make sure that any necessary doors, windows, light fixtures, and electrical outlets are accessible. Revisit the earlier questions and make sure you get the same answers: Will there be adequate ventilation and light? Will chalk dust affect your living space? What about other uses for the area? Does the car still fit in the garage? Will your shelving work?
Make sure you have enough area to assemble the pieces separately, fasten them together, and stand them up. Try to allow about twice as much working space as the wall will require when finished. This, of course, will vary based on the degree of overhang and height. Make sure you have enough clearance to stand the wall up without getting it wedged against the ceiling before it is in place.
Materials List
You can roughly estimate the material cost (not including holds or paint) of your wall by multiplying twice the number of full sheets of plywood in your design by the cost per sheet. For example, 3/4″ ACX plywood might cost $42 a sheet. If your design uses 4 sheets, your cost estimate will be (2 x 4) 42 = $336. If the budget still looks OK, it's time to use your dimensional drawing to assemble a comprehensive materials list.
Before you make your list, you must determine the necessary sizes and types of materials and how each type of material will attach to the others. Use 3/4″ ACX plywood for the sheeting. This is a high-grade, exterior plywood. Lower grades of plywood have more voids in the inner layers, so it is quite possible to rip T-nuts right through the sheeting while climbing. Nothing thinner than 3/4″ is strong enough, and all U.S. hold manufacturers base bolt and T-nut lengths on 3/4″ sheeting.
Framing studs will run vertically every 16 inches behind each wall, as well as at the top and bottom, to form the framework. An eight-foot wide wall will require nine studs (seven vertical studs spaced 16 inches apart as well as a top plate and bottom plate). Optionally, the vertical studs can be spaced 24 inches apart rather than 16, which will allow for more T-nut placements, but wider studs must be used, and the plywood sheeting will be prone to flexing.
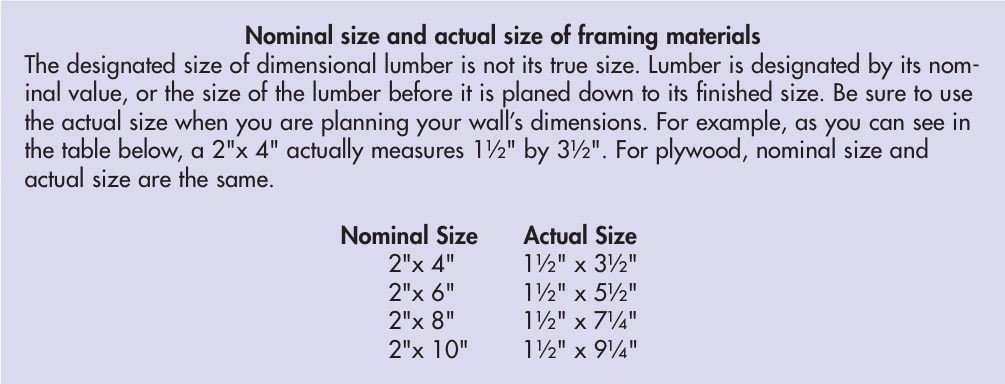
While short, vertical walls can be framed with 2″x 4″ studs, overhanging walls must use wider, stronger framing materials. The required size of framing materials is determined by both their span and the load they must bear. Slightly overhanging walls should use 2″x 6″ or 2″x 8″ studs and steeper walls or those taller than 8 feet must use 2″x 8″ or 2″x 10″ studs. When you buy framing studs, sort through the stack and pick the straightest ones with the fewest knots.
Assemble your wall with self-drilling decking screws, which hold better and, in case you make a mistake, are easier to disassemble than nails. Use #14 x 3-1/2″ (or 4-1/2″ if screwing through drywall) screws to anchor header joists or plates to your support structure, #12 x 3″ screws to join framing members, and #8 x 2″ screws to attach the plywood to the framework.
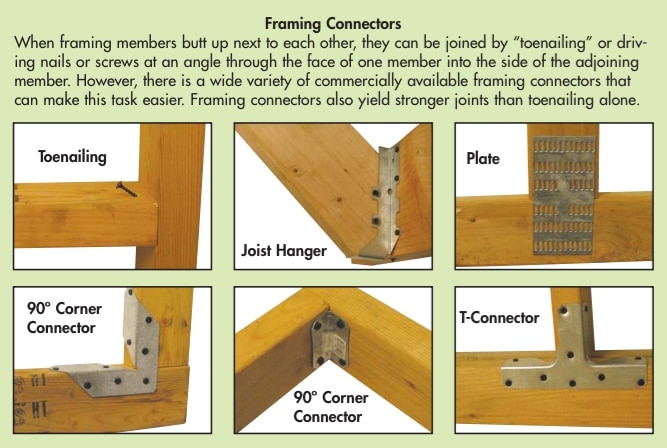
Don't use drywall screws or hardened screws which are brittle and prone to failure in this application. You should also have a pound or two of 16d nails for temporarily tacking framing members and for spots that you can't access with the screw gun. Depending upon your support structure and configuration, you might need a variety of other materials. The list below will provide a few ideas.
Materials:
- Plywood: 3/4″ ACX, 4'x 8′ sheets
- Wood framing-studs: 2″x 4″, 2″x 6″, 2″x 8″, 2″x 10″
- Self-drilling decking screws: #14 x 3-1/2″ (or 4-1/2″), #12 x 3″, #8 x 2″
- Nails: 16d vinyl-coated, sinker
- T-nuts: 3/8″, 4-prong, steel
- Concrete expansion anchors
- Joist hangers
- Framing connectors
Tools:
- Tape measure
- Level, 4′
- Combination or framing square
- Chalk line
- T-bevel
- Pencils
- Stud finder
- Claw hammer
- Wood chisel
- Circular saw
- Miter saw
- Power drill
- Drill bits, incl. 1/2″ spade or Forstner
- Cordless drill or screw gun
- Screwdriver bits, #2 Phillips head or square drive (Get a lot of these; they wear out fast!)
- Jigsaw
- Extension cords
- Pry bar
- Gloves
- Safety glasses
- Step ladder and/or extension ladder
- Saw horses
- Various clamps, incl. 6″ C-clamps and 12″ bar clamps
- Hex wrenches: 5/16″ and 7/32″
Construct the Climbing Wall
We'll describe the construction method for a common scenario here, but most of the following information will apply to any home bouldering wall configuration.
Framework
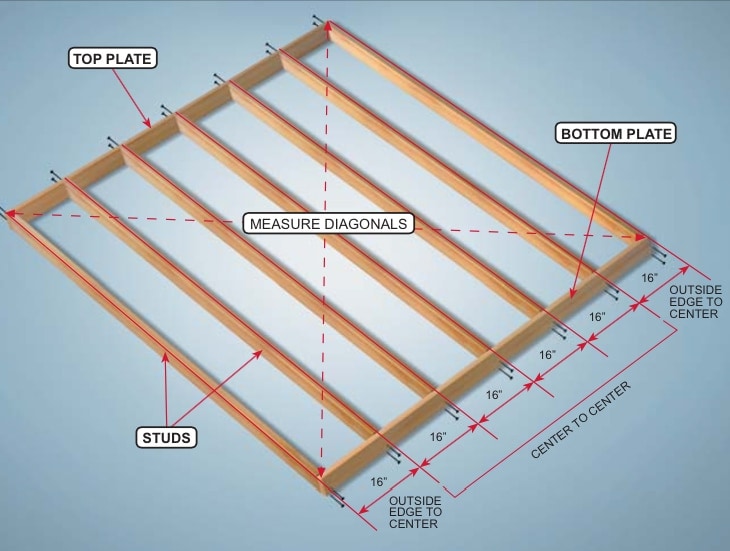
You should frame each of your walls separately. Build one framework section and attach it to the support structure before building the next piece of framework. Begin with the largest or most important wall and progress to the smallest or least important. This will allow you to make any necessary adjustments that the space may require with minimal trauma. Once the framework is in place for the primary walls, you will connect them with additional framing members to create the secondary walls.
If you're not familiar with framing terminology, don't be confused by the terms "stud" and "joist." For our purposes, they are essentially the same. Technically, studs run vertically in a house's walls while joists run horizontally in the floor or ceiling. Few bouldering walls are purely vertical or horizontal, so we vary the term depending upon the situation. You may also hear these framework members referred to as "stringers."
Walls that aren't too steep (say, up to 20° overhanging) can be framed flat on the ground then hoisted into place as a unit, much like the walls of a house. Lay the top and bottom plates and the two outer studs on the floor. Measure diagonally from opposite corners, and compare the length of both diagonals to ensure that the frame is square. Adjust the frame until the diagonals are equal, and secure the four corners with screws.
Measure along the top and bottom plates and mark the locations for the inner studs every 16 inches. Make your measurements from the same side of the frame at the top and the bottom. Measure from the outside of the outer stud to the center of the first inner stud, then center-to-center for the rest of the studs. If your wall is wider than a sheet of plywood, make sure that the sheet will end in the middle of a stud, so the next sheet will have room to attach to the same stud. If you use 16″ or 24″ spacing and measure correctly, this will happen automatically.
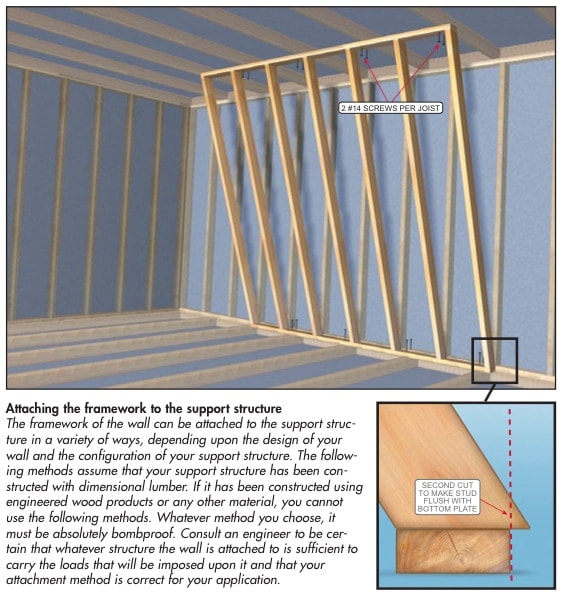
If you're framing a vertical wall or horizontal roof, the ends of the studs or joists will be cut straight across or perpendicular to their length. However, if you are framing an overhanging wall, you'll need to cut the studs at an angle, so the top and bottom plates will sit flat on the ground (or flat to the wall) and flat to the ceiling. Use a T-bevel to mark the correct angle and cut one stud. Check it for fit, then use it as a template to cut all the other studs identically. Because you've cut the end of the stud off at an angle, it will now be wider than the plate where it attaches. If the wall will sit flat on the ground, align the front (or climbing side) of the stud with the front of the plate, then make a second cut on the backside of the stud, so it is flush with the plate.
Lumber is rarely straight, so sight down each stud to see which way it curves. Assemble the framework with the high side of the curve (the crown) facing toward the back side of your wall. Set the studs in place using a framing square to make sure each stud is square to the top and bottom plates. Recheck that the outer framework is square, and screw everything together.
If you've framed the wall on the ground as described above, simply tilt it up into position, recheck it for square, and screw through the top and bottom plates directly into every ceiling and floor joist along their spans, using two #14 screws per joist. Exposed framing will make this task easier. However, fire codes require wallboard on all interior walls and ceilings, so you will probably need to use a stud finder to locate the framing members. Your house's wall studs are usually spaced on 16″ centers (i.e., the distance from one stud's center point to the next), and floor or ceiling joists are usually on 24″ centers, so once you find the first stud or joist it should be easy to find the rest.
Since you'll be screwing through the drywall, you won't be able to visually verify the quality of the attachment. Make sure that the screws go in solidly and there is resistance all the way in. Plates can be attached to concrete walls or floors with concrete expansion anchors.
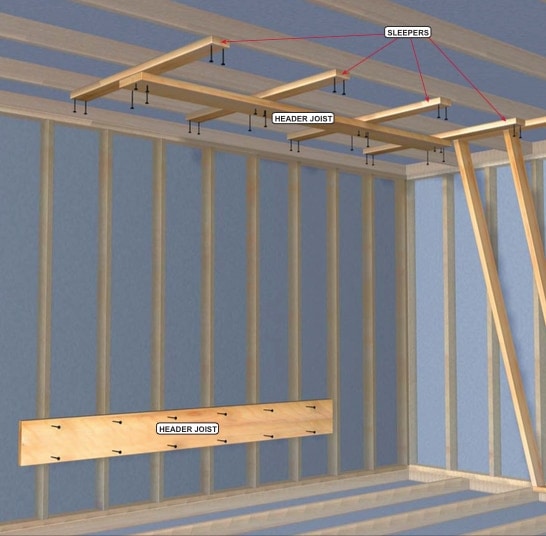
If your wall runs parallel, or at any angle other than perpendicular, to the ceiling joists, run sleepers perpendicular to the joists, spaced on 24″ centers, picking up at least three joists with each sleeper. Then attach your wall's top plate (or header joist) to the sleepers.
Overhanging walls transfer their loads to the support structure in a different manner than near-vertical walls. They are more akin to residential floors than walls. Frame steep walls by first attaching header joists (the equivalent of top and bottom plates) to your house's ceiling joists and wall studs. Screw each header joist into every stud or joist along its span using at least two #14 screws per stud or joist, just as described earlier in the top and bottom plate method.
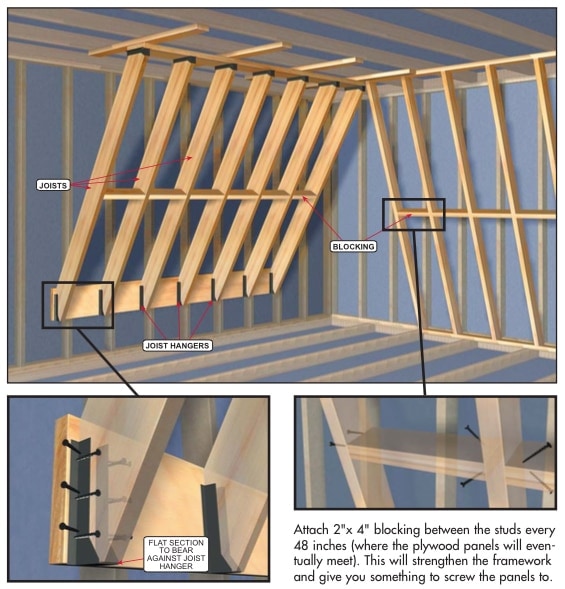
Make sure your header joists are level and square to each other, so your wall framework and plywood sheeting will fit correctly. It's rare for residential walls, floors or ceilings to be perfectly square and level, so don't base your positioning on the existing structure. Verify the relative position of the header joists with a level and tape measure.
Then run joists (the equivalent of studs) between the headers every 16 inches, again, facing the crown of each joist up (or back). Attach the joists with joist hangers. Cut a short flat section at the end of each joist to bear against the hanger.
Plywood Sheeting
Before the plywood is attached to the framework, you need to install the T-nuts. Stack 3 to 6 panels on saw horses and clamp them together. The ACX plywood sheets have an "A" side and a "C" side, meaning one side is a higher grade of laminate and has fewer voids or blemishes. Face the "A" sides up. These will face out to make the climbing surface when the panels are in place.
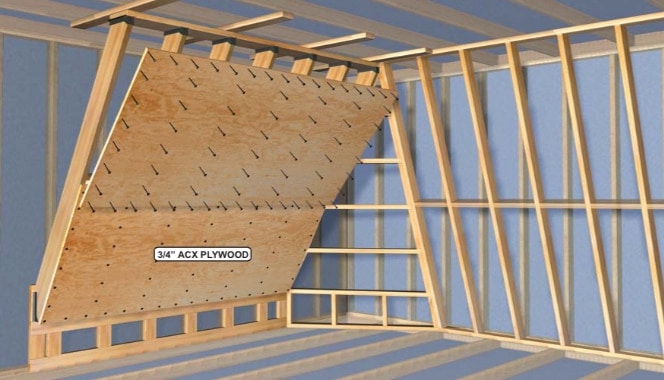
Mark the locations where the joists will be when the panel is in place (each end and every 16 inches). Usually it's easier to position the panels horizontally on the framework, but if they will fit your wall configuration better in the vertical orientation, take note of it now and mark the joist locations accordingly. You can layout a grid pattern or drill holes randomly. Either way, don't put any holes where the joists will be. You'll want 100 to 250 T-nuts per sheet, the more the better. Sheets that will go at the bottom of the wall will take mostly footholds so you can install fewer T-nuts and use screw- on holds liberally.
Use a 1/2″ Forstner or spade-style drill bit to drill the T-nut holes. It is critical that you drill the holes straight. Inexpensive drill press attachments are available for your hand drill that will insure straight holes.
If your design calls for anything other than full 4'x 8′ sheets, cut the necessary panels to size now. Make sure you cut the panels and check their fit before installing the T-nuts.
Turn the panels over and knock off any splinters from the drilling. Install the T-nuts on the "C" side (the opposite side that you drilled from). Tap the T-nuts into the holes with a hammer. Make sure you set the T-nuts straight. A little extra time and care now will save an enormous amount of headache later.
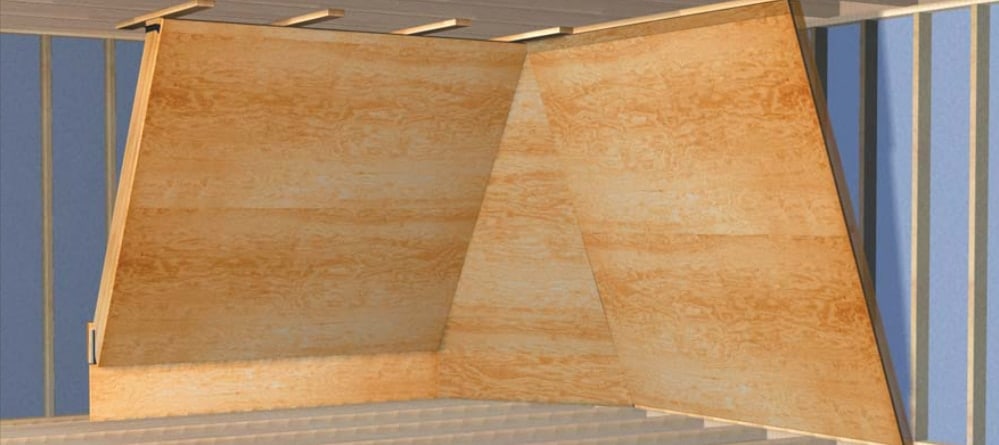
Now that the panels are cut to size and the T-nuts are installed, it's time to put the panels in place on the framework. Screw a couple of jug holds on panels to help maneuver them into place. Attach the panels with #8 x 2″ self-drive screws spaced about 6 inches apart all the way around the perimeter and along each joist or stud. Make sure the screws are going into the center of the stud (i.e. 3/4″ from the edge of the panel except where panels meet, in which case, 3/8″ from the edge.) The 2″x 4″ blocking between the joists should be right where the panels meet so you will have a solid attachment and a tight joint between panels.
Painting
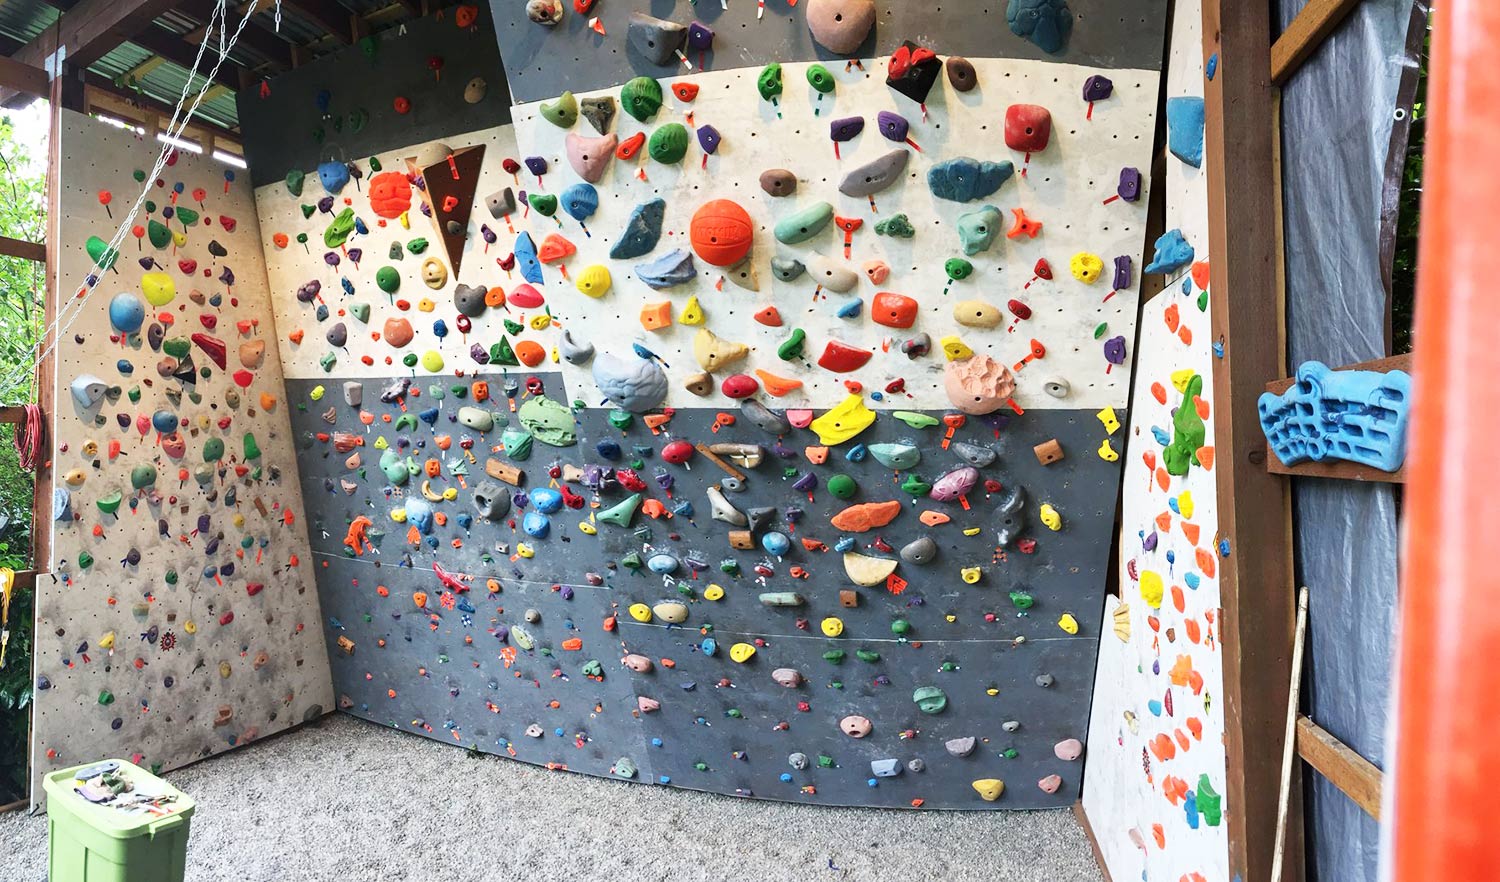
Bare plywood is fine for indoor walls, but a coat of paint is crucial for protection if the wall is outdoors or in a humid environment. Any exterior-grade paint will work. Plug your T-nuts with golf tees during the process to keep paint out of the threads.
Fall Zone
The area underneath and around your wall must be made safe for falling. Ensure that this area is free of any objects that you could hit or land on in a fall. Never boulder over unpadded concrete, asphalt, wood, or any other hard surface. Falls directly onto an unprotected surface can result in serious head injury or even death. Even grass and turf will lose its ability to absorb the shock of a fall through wear and weather. Your fall zone must extend far enough to protect you from swinging falls or dynos. If your wall is steep, this could mean that you will need to extend your fall zone several yards past the edges of the wall.
There are several options for padding your fall zone including commercially available bouldering pads, old mattresses, or several layers of carpet padding. However you choose to prepare your fall zone, you must take the responsibility of making it safe very seriously. Artificial climbing holds regularly spin or break, resulting in violent, out-of-control falls. You must never put yourself or others in a position that could result in injury in the case of an unexpected fall.
Maintenance
The most common maintenance procedure you will need to perform on your bouldering wall is tightening and inspecting the holds. Remove any damaged or cracked holds immediately, even if the crack is very small. Holds will loosen with surprising speed and regularity, especially when your wall is new, after temperature changes, or in a humid environment. Spinning or breaking holds can result in very dangerous falls, so it is important to inspectand tighten them frequently.
T-nuts will sometimes spin in the plywood or become cross-threaded or stripped. If a T-nut has spun or is severely cross-threaded and you cannot tighten or loosen the bolt, fit a pry bar under the edge of the hold and pry outwards. Then try to loosen the bolt under tension. If this doesn't work, you'll have to slip a hacksaw blade between the hold and the wall and cut the bolt. Tap a damaged T-nut out from the front of the wall using a bolt, then install a new one by threading it onto a bolt that is through a hold (use a strong, thick one) and drawing it into place by tightening the bolt. If the plywood is severly damaged, do not reuse the hole. If there is only minor damage, you can epoxy the new T-nut in place or anchor it from behindwith short wood-screws to keep it from spinning.
Periodically check bolts, screws, joints, and any other hardware on your wall for looseness, wear, or damage. Look for signs of stress like expanding joints or seams, that may indicate that your wall requires reinforcement or repair.
Add Climbing Holds
The selection of climbing holds is the single most important element of a good home bouldering wall. Holds will probably be the most expensive budget item for your wall, so you'll want to make sure you spend your money wisely. When you're outfitting a new wall, having enough holds and enough variety are the most important considerations. Later on, as you add to your existing selection, other criteria will become more important, but for now, focus on maximizing your hold buying dollars to get the biggest variety you can. Metolius offers large sets of holds with many different sizes and styles. These packages offer the best value for setting up a new wall. When you're shopping around, remember to compare the size of hold you are getting as well as the number of holds. One manufacturer might offer a 50-hold set for the same price as another manufacturer's 40 hold set, but the 50 hold set might be full of smaller holds. Hold prices are almost entirely dictated by the amount of material in the hold, so make sure you're considering like-sized holds when comparing prices.
A good rule of thumb is to have at least one hold per square foot of wall surface. That's 32 holds per full sheet of plywood.
When you're starting out, you can get by with 15 to 20 holds per sheet, but the more holds you have, the more fun and interesting your wall will be. Many home walls end up with over 100 holds per sheet of plywood.
For now, don't worry too much about the specific hold shapes, just make sure you have the right mix of hold types. The bulk of your selection (about 60%) should be medium-sized bolt-on holds of every possible style (edges, pockets, pinches, slopers, etc.). About 20% of your selection should be footholds. These can be small bolt-on holds or screw-ons. Screw-ons are ideal for plywood walls. They're a great value; they will go places where bolt-on holds won't, like in front of framing members or in corners, and they can be made thinner than bolt-ons, so they make climbing on plastic more technical and realistic. The only downside is that screw-ons are somewhat less durable than bolt-ons.
About 10% of your selection should be small handholds. These will be very similar to the footholds, but slightly larger and more positive. Again, maximize the value and variety that screw-ons can offer. Much of your small hold selection will work as either hand or footholds, so don't get too hung up on the difference between the two styles. Just try to make sure that about 30% of your total selection consists of a good variety of small holds. Depending upon the angle of your wall and your ability level, 10 to 20% of your selection should be jug holds. Metolius offers a wide variety of mini jugs. These are great for home walls because they take up less space than full-size jugs and they are substantially less expensive. Finally, be sure to get some specialty shapes like corner holds, low-profile plates and rails, big slopers, etc. to keep things interesting.
Installation
Most commercially available climbing holds attach with 3/8″ socket head cap screws. There are 3 different styles of heads that are commonly used. Each different style works with a different shape of bolt hole in the hold. It is very important to use the correct style of bolt. The most common style is the standard socket head. This is the strongest, but it also has the highest profile. These bolts require a 5/16″ hex wrench. Low-profile holds require the use of bolts with flat heads or button heads.
Flatheads have a flat top and tapered sides, which match a tapered countersink in the hold. Button head bolts are often used on thin holds that have no countersink. Usually, you can substitute a standard socket head bolt for a button head, but it will stick out farther and may interfere with the intended use of the hold. Flatheads and button heads use a 7/32″ hex wrench. Never substitute a socket head or button head in a hold that was designed for a flat head. It will weaken and possibly break the hold.
Different holds require different bolt lengths. It is critical to use the correct length bolt for your safety. On a home wall that uses 3/4″ plywood, the bolt must stick out from the back of the hold at least 3/4″ in order to fully engage the T-nut threads. It is okay to use a longer bolt as long as there is enough space behind the wall to allow you to fully tighten it. Longer bolts usually have a shoulder or unthreaded portion behind the head. Make sure that the shoulder doesn't extend past the back of the hold or you won't be able to fully tighten it.
Most manufacturers include the correct bolt with their holds, so there is no excuse for using incorrect hardware.
Screw-on holds are ideal for home walls. These holds attach to wooden walls with self-drive screws. Because many screw-on holds are quite thin, they can be relatively fragile. It's best to attach thin screw-ons once and not move them. They are so low-profile that usually they won't interfere with other holds, so there is little disadvantage to installing them permanently. If you are using a power drill or screw gun to install your screw-ons, set the clutch to the lightest setting. Try not to drive the screws all the way in with the drill. Finish tightening them by hand so you won't break as many holds. It is a good idea to use construction adhesive or epoxy in addition to the screws. This will vastly increase the life span of tiny screw-on holds.
Now it's time to put your holds up. Get a couple of good T-handle hex wrenches to make this task easier. The bottom panels of your wall should contain mostly footholds. If you're using screw-on footholds, make sure you attach them far enough from existing T-nut holes that they won't interfere with attaching bolt-on holds later. Fill the bottom panels with as many different footholds as possible, but save a few holes for starting jugs. Home bouldering walls will have plenty of problems with sit starts, so you'll need some jugs low down. It's good to use a lot of underclings and side-pulls for starting jugs so they don't end up as enormous footholds once you've climbed past them. You'll also want to put a few jugs at the top of your wall for finishing jugs.
You'll also want to put a few jugs at the top of your wall for finishing jugs. Obviously, the top panel or two won't need any footholds, so use any remaining footholds on the bottom half of the wall. Now fill the rest of your wall with the remaining holds. If your wall has multiple angles, you'll want to put most of the bigger or more positive holds on the steeper areas and vice versa, but try to mix it up and keep the variety as high as possible. Remember that any given hold can be oriented to pull straight down, sideways, as an undercling, or anything in between.
Set Routes on Your Wall
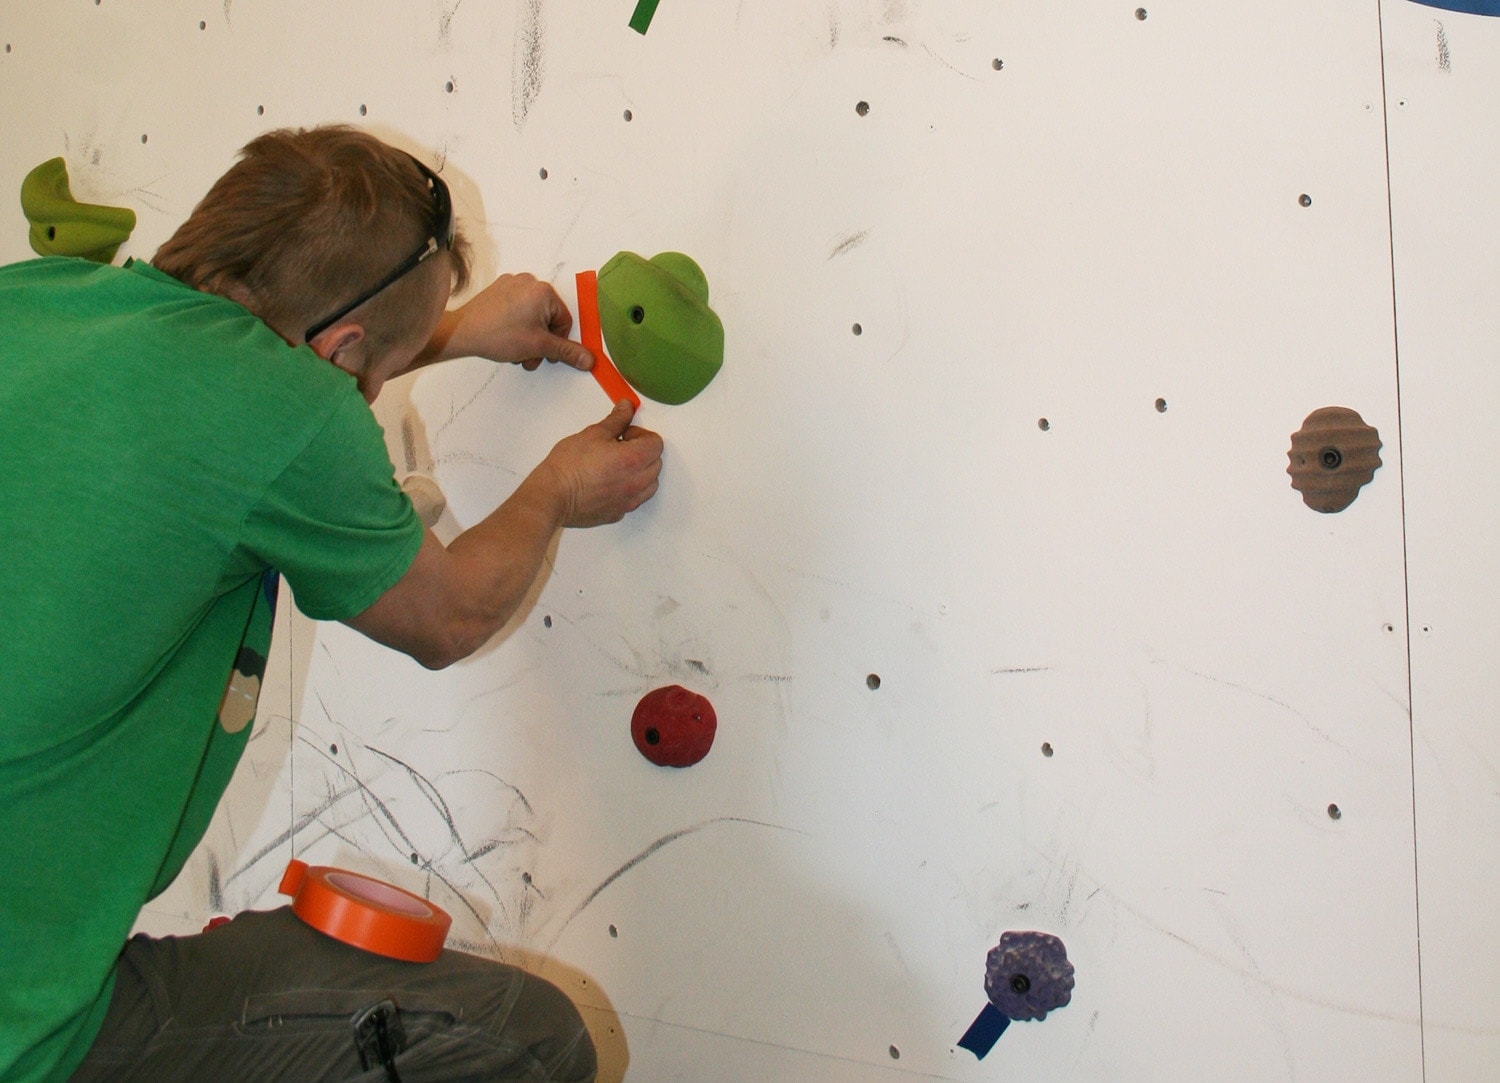
Making boulder problems can be as simple as picking a few holds at random and pulling between them, but the more thought you put into designing your problems, the more fun they will be. Try to employ the widest variety of moves that you can; don't be afraid to include sideways or even downward movements in your problems. Think of every different hold as a potential side-pull or undercling (e.g. don't fall into the common rut of only pulling downward on pockets.) Avoid using big footholds. They won't help you improve your technique or develop good core strength. Experiment with footwork by designating problems as "open" (any hold on the wall can be used as a foothold), "tracking" (only the designated handholds on the problem can be used as footholds), "screw-ons only," or designate specific footholds for each move.
You'll want to develop a library of problems, so when you set a good one, mark it with colored tape and record the start and finish holds, number of moves, color of tape, footwork restrictions, etc. in a book.
Want more? Read our feature: How to Set on Your Home Wall
Time to Climb
With your wall finished and intoxicating visions of burning-off your climbing partners with your new-found power clouding your judgement, you'll want to jump on that thing and start training like a circus monkey. Be careful! Home bouldering walls are so convenient, efficient and fun to use that it can be easy to develop over-use injuries. Always warm-up thoroughly and make sure you're getting plenty of rest between sessions. Over-use injuries are often the result of muscular imbalance so it is important to work your antagonistic muscles as well. (These are the muscles that are opposed to those used in climbing, mostly extensor muscles like triceps, pectorals, finger extensors, etc.) Perform some push-ups and dips for your chest and triceps and use a Metolius GripSaver Plus to balance the muscles of your hands, wrists and forearms. Follow this simple advice and you'll soon be on your way to the best climbing season you've ever had.
Train smart, climb safe, and have fun! Need a refresher on climbing? Check out a climbing class at an REI store near you.
