Triathlons have come a long way since 1974, when 46 people competed in the first swim/bike/run race, held in San Diego, CA. If you've decided to try this exciting, addicting and challenging sport, you're in good company—today, more than 2 million people participate in triathlons each year.
To get ready, you'll need a well-designed training plan that will increase your performance in all three areas, while also helping to keep you in healthy shape as you train.
As always, be sure to consult with your doctor before starting any new training routine.
Triathlon Distances
Triathlons feature a wide range of distances. While this article focuses specifically on the introductory sprint distance, here's a quick breakdown of all triathlon types:
Sprint (16 miles): This is a great option for anyone new to the sport. Distances vary, but typically the swim portion is about 0.5 miles (750m), the bike is 12.4 miles (20km) and the run is 3.1 miles (5km).
Olympic (51.5km): First introduced during the 2000 Summer Games held in Sydney, Australia, this race features a 0.93 mile (1.5km) swim, a 24.8 mile (40km) bike, and a 6.2 mile (10km) run.
Half Ironman (70.3 miles): For veterans who are looking to challenge their endurance, but are not ready or able to put forth the time commitment for a full Ironman, the Half Ironman is a great choice. Race venues can make these longer races very challenging, but the distance is always the same: swim 1.2 miles (1.9km), bike 56 miles (90km), and run 13.1 miles (21.09km).
Ironman (140.6 miles): Although Ironman competitions take place all over the world, the one event most people think of is the annual World Championships held in Kona, Hawaii. This race consists of a 2.4 mile (3.8km) swim, 112 mile (180km) bike, and a 26.2 (42.2km) run.
Set a Triathlon Training Plan
When to begin: In general, if you are aiming to complete your first sprint triathlon, plan for at least 12 weeks of training prior to your event. If you are very healthy, physically fit, and familiar with swimming, biking and running, an 8-week build program could be sufficient. If you are starting from scratch, you may want to give yourself 16 weeks to train.
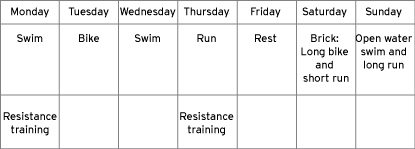
Establish your swim/bike/run schedule: Complete a minimum of two sessions of each activity (swim, bike and run) during the week. Also include a brick session, which is your bike and run workout completed back-to-back (and which can also be a swim/bike workout). Finally, include an open water swim or two each week if your race is taking place in a body of water other than a pool.
Gradually build and increase your distances by no more than 10 percent per week. Prior to the race, you should be able to complete at least 10 percent more than the total race distance in each sport (for a sprint, that translates to a 0.55-mile swim, a 13.6-mile bike ride and 3.4-mile run).
Resistance training: Be sure to include resistance training as part of your weekly program, which can be done after your main endurance work. Include exercises that strengthen the primary muscles needed in each discipline, as well as create mobility and stability for effective, healthy range of motion.
For the swim, you want to enhance strength in the back, shoulders, and arms and create mobility in the trunk. For the bike, focus on increasing strength in the quads, glutes and hamstrings and creating stability in the trunk and chest. And for the run, you want to build strength in the legs, mobility through the hips and stability through the trunk and shoulders.
Incorporate rest: Taking off a day or two each week is essential for recovery. Rest days should be taken either before or right after your long brick workout, or both if you are including two rest days in your program.
Sample Week
Triathlon Training Tips
Take the time to familiarize yourself with the course of the race you have chosen and, if possible, practice swimming, biking and running each portion.
Swimming Basics
The swim portion of a triathlon is often the most challenging for those new to triathlons. If you are new to swimming, it is important to find a coach or team that you can practice with to be sure you are using correct technique. Often the hardest part is learning how to coordinate your breath with your stroke—if your stroke is inefficient and you're struggling to breathe, you'll head into the bike and run segments with less energy.
Equipment: For your race, you will be given a swim cap that indicates your start time (determined by age category), so you will want to practice swimming with a cap to get use to the feeling.
Make sure to find goggles that fit and have a good seal around the eyes. When swimming, put the goggles on first, then the cap, as this will help to keep your goggles from getting lost in the open water should you get bumped by another swimmer during the race. Shop for swim goggles and accessories.
Depending on your swim venue, you may also want to invest in a wetsuit. According to USA Triathlon rules, if the water temperature is below 78 degrees
Fahrenheit, wetsuits are legal and actually offer a bit of an advantage due to extra floatation. With water temperatures between 78-84 degrees, wetsuits are allowed; however, if you choose to wear one you will not be eligible for any awards. Above 84 degrees, wetsuits are not allowed as they pose more of a health hazard due to overheating. All wetsuits must be less than 5mm thick to avoid disqualification. Shop for wetsuits.
Under your wetsuit, or as your swim attire, you should wear some type of triathlon-specific race suit. There are many options for both males and females (one piece, two piece, triathlon-specific shorts, built-in sports bras, etc.). If you can, try out a few options over the course of your training so you are comfortable on race day. Word to the wise: Do not wear traditional bike shorts during the swim! The extra padding when wet is not comfortable for the remainder of the race.
Technique: When swimming, the most important thing to remember is to keep your head down. Imagine that you have a dowel rod that goes through the top of your head and out your feet. You should be rotating about this rod from one side to the other side of your body with every stroke, breathing every two to three strokes to the side (not up) during the recovery (or glide) phase of the stroke.
For triathletes, it is important to be able to breathe bilaterally to be able to adjust to the venue, water conditions and other swimmers around you. Sighting is also something to practice during training so that you are able to stay on course. Every 3-5 strokes, look up and make sure you are still on track toward your next buoy or turn and then put your head back down to get the most out of each stroke.
Training schedule: To get in shape for this part of the event, aim for two swims per week. For a sprint event, work up to swimming between 0.5-1.0 mile in the pool, as well as in open water, as most races take place in oceans or lakes. Before swimming in open water, be sure you are comfortable and competent swimming in a controlled environment. When you do decide to practice in open water, be sure you know your venue and whether there are any rip currents, sea creatures or regulations in the area you are swimming. It is always safer to swim with a partner or group and make sure you swim during daylight hours.
Biking Basics
Equipment: When compared to the other legs of a triathlon, the bike portion requires the most technical gear. There are only a few race rules regarding the actual bike, so you don't need to buy a completely new carbon frame with disc race wheels for your event. If you choose, you can complete a race using your weekend beach cruiser or trusty mountain bike, although a standard road bike will likely give you a much better race time. Using clipless bike pedals and compatible shoes will also help you get the most out of each pedal stroke. (See our Expert Advice article about how to choose clipless bike pedals.)
Regardless of the type of bike you own (or you can choose to rent one from a local bike shop for your training and event), it is important that the bike is fitted specifically to your body. Take the time and effort to see a bike specialist to have a professional bike fitting done.
Also remember that you will be required to wear a helmet when participating in a triathlon. Shop for bike helmets.
Technique: When cycling, think of your foot moving with the pedals like a clock. From the top of the pedal stroke (12 o'clock) to the bottom (6 o'clock), use your glutes and quads to push down. Then pretend from about 5 o'clock to 7 o'clock that you are scraping gum off the bottom of your shoe and keep your foot flat. From 6 o'clock back up to 12 o'clock, which is the recovery portion of the stroke, use your hamstrings to pull the pedal back up. Your most efficient cadence will vary depending on your bike, your fitness level and the terrain, so practice riding in different gears and on varied elevation to find what is best for you and your body.
Practice shifting smoothly between different gears on your bike, particularly as you encounter hills. Ride outdoors as much as possible and familiarize yourself with the rules of the road when it comes to cycling, and use bike lanes as much as possible while training. Never ride with headphones, as this is both dangerous and not allowed during a race.
On your rides, practice stopping, starting, turning, slowing down, shifting gears (particularly when approaching hills) clipping in and out of your pedals (if applicable) and taking a drink from your water bottle (which you should always have on your bike). It's also a good idea to practice riding in a group; local bike clubs are a great resource.
When you can't get outdoors, you can use an indoor stationary bike (the kind used in indoor cycling classes).
Training schedule: If you're training for your first sprint, include two to three bike sessions per week, depending on your fitness level and experience on the bike. Build up to 15 to 20 miles, and don't forget to include some hill training, especially if your race includes hills.
Running Basics
Equipment: All you need for this portion of the race is comfortable running clothes and a pair of high-quality running shoes. During a sprint race, there will likely be a couple of aid stations on the run that offer water and/or electrolyte drinks, so be sure to take advantage of those stops to stay hydrated. See our Expert Advice articles on how to choose running shoes and how to choose running clothing.
Technique: When doing endurance running, stride cadence is essential. Lean forward slightly through your chest, relax the hands, and allow the arms to swing forward and back from the shoulders, keeping the elbows bent at 90 degrees. As each foot hits the ground, think of hot lava and quickly lift the foot to move on to the next step. Aim for a pace of 150-180 beats per minute (or between 75 and 90 foot strikes per minute/per foot).
Training schedule: Include two to three runs per week, with one run immediately following your longest bike ride (your brick). To build speed and endurance, include speed workouts on a track, but make sure that you are able to complete at least three miles or 30 minutes consecutively before adding in this type of higher intensity running into your program. These workouts may include 4 x 400s on a track (one lap equals 400 meters) with 1-3 minutes of recovery between laps. By doing short bursts on a measured track, you are able to improve speed and also learn about pacing yourself to help you reach your race goals.
Sample Resistance Workout
Perform the following workout after completing a five- to 10-minute warm-up that consists of either cycling or jogging and some light foam rolling. After the workout, be sure to foam roll again and perform static stretches for the chest, triceps, glutes, quads, hamstrings and calves.
Begin with Circuit #1 and perform each exercise for 30 seconds, quickly transitioning between each exercise. Rest for 60 seconds and then move on to Circuit #2 and perform each exercise for 30 seconds. Once you've finished Circuit #2, rest for 60 seconds and then repeat both circuits two to four more times, depending on your fitness level and time available.
CIRCUIT #1
Overhead Squat
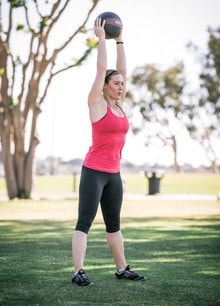
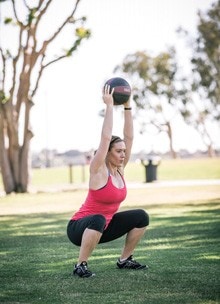
- Hold a medicine ball overhead with arms extended.
- Position feet hip- to shoulder-width apart with a slight external rotation of the feet.
- Sit the hips down and back into a deep squat until the hips roll under your body or the arms are no longer able to stay straight
(whichever comes first). - Repeat exercise for 30 seconds.
Romanian Dead Lift With Upright Row
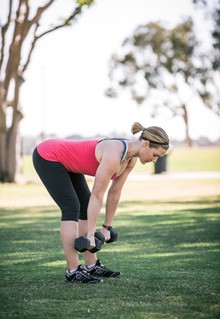
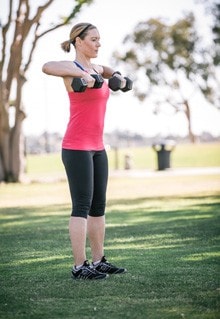
- Hold a dumbbell in each hand in line with the legs. Keep the back straight and the knees soft as you guide the hands toward the shins.
- Keep the core engaged and pull with the hamstrings as you raise back up.
- When the hips have fully extended, pull the elbows upward, lifting the dumbbells to your chest height while keeping the wrists in a neutral position.
- Repeat exercise for 30 seconds.
Tick Tock Plank
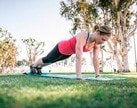
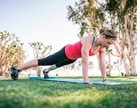
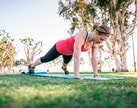
- Assume a plank position with the hands positioned below the shoulders.
- Step one leg out to the side and bring it quickly back in toward the other.
- Repeat on the other side so that each leg is quickly moving in and out like a pendulum.
- Keep the hips stable and the core engaged.
- Repeat exercise for 30 seconds.
Kneeling Chop
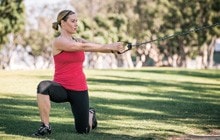
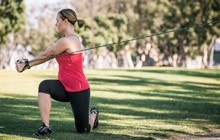
- Anchor a resistance band and assume a half-kneeling or lunging stance perpendicular to the band, with the outside leg forward.
- Grasp the handles and turn 90 degrees away from the anchor point.
- Keep the arms straight and rotate the hands back toward the anchor point.
- Repeat exercise for 30 seconds and then switch sides. Repeat on the other side for 30 seconds before moving on to the next exercise.
CIRCUIT #2
Split Squat
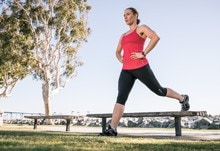
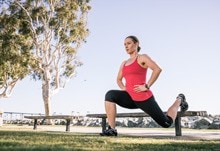
- With your back foot elevated on a low platform, step out your front foot to a comfortable lunging position.
- Keep your chest up as you lower your body and bend the front knee to 90 degrees, or until you feel a comfortable stretch in the rear hip flexor.
- Repeat the lunges for 30 seconds and then switch sides. Perform the second side for 30 seconds before moving on to the next exercise.
Suspension Row
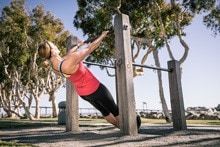
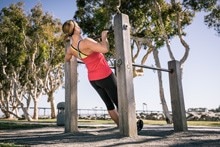
- Using a bar or suspension trainer, begin with the arms straight and the feet placed a comfortable distance away that enables you to maintain a stable backward lean with your body in alignment from head to toe.
- Keep the body rigid and engage the lats and upper back muscles to pull the elbows back and bring the chest upward.
- Repeat exercise for 30 seconds.
Tricep Push-ups
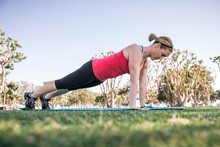
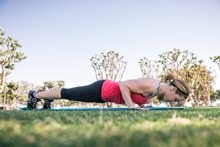
- Begin in a push-up position with hands placed below the shoulders.
- Keep the elbows in toward the sides as you lower the body down as one unit until the chest is just above the floor.
- While keeping the trunk engaged, extend the elbows and push the body back up to the starting position.
- Repeat exercise for 30 seconds.
Thread-the-Needle Plank
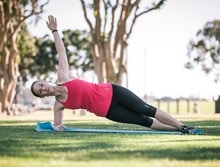
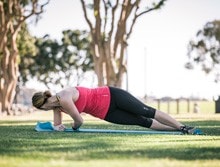
- Begin on your side with your supporting elbow under your shoulder and your forearm perpendicular to your body. Stack your top foot onto the bottom foot.
- Reach your top arm straight up to the sky, and then rotate your trunk and hips as you lower the arm and thread it under your body.
- Maintain a straight body line as you rotate back up to the starting position.
- Repeat exercise for 30 seconds.
The nonprofit American Council on Exercise (ACE) educates, certifies, and represents more than 53,000 fitness professionals, health coaches, and other allied health professionals.
This publication is not intended to provide medical advice on personal health issues, which should be obtained directly from a physician.
