Trekking poles and hiking staffs are standard equipment for many walkers, hikers, trekkers, backpackers and snowshoers of all abilities—and for good reason. They can transform a mediocre or even a sketchy walk into a great hike by enhancing stability and providing support on all types of terrain. In this article, we'll talk about how to use trekking poles effectively.
There are several types of trekking and hiking poles. This guide will primarily focus on two:
- Trekking Poles: Sold as a pair and used in tandem, trekking poles enhance your stability and can reduce force on your knees while hiking and backpacking. Most are adjustable in length, and some include internal springs that absorb shock to further reduce impact. There are several variations within the category, including ultralight poles, which can weigh less than one pound per pair and produce less fatigue over the course of a long outing.
- Hiking Staff: Sometimes called a walking staff or traveling staff, this is a single pole that's most effective when used on relatively flat terrain and when you're carrying little or no load on your back. Hiking staffs are adjustable, and some include a shock-absorbing feature. They may also include a built-in camera mount under the grip so the staff can be used as a monopod.
Those are far from the only features. Some poles include ergonomic grips with a corrective angle to keep your wrist in a comfortable position, while hiking staffs may feature a grip that is more like the handle on a cane. Grips are also made of different materials such as foam and cork. Poles also feature different kinds of locks that secure them into place once extended, and some locks can be easier to use than others for different folks. Our advice: Don't buy trekking poles or a hiking staff without trying the gear first to find what works best for you. You can even rent a pair through your local REI to see how they feel.
Related reading: How to Choose Trekking Poles and Hiking Staffs
Covered in this guide:
- Who are trekking poles for?
- What's the right trekking pole length for you?
- Getting the most from straps, baskets and tips
- Tips for walking with hiking poles
 Who are trekking poles for?
Short answer: everyone! Trekking poles can aid just about anybody on the trail, from a strong long-hauler to someone who's just starting out. They can help relieve stress on your back, core and legs by harnessing your upper-body strength. If you're coming back from an injury; have a disability; are seasoned but hope to tackle longer distances; or are just getting the hang of trekking, the stability and support offered by trekking poles can't be understated.
Trekking Poles for Casual or Beginner Hikers
For inexperienced hikers, trekking poles can make the difference between a hike being a highlight of their bucket list, or a miserable trudge. I have over eight years of guiding experience and have lead hikes through Southeast Alaska, the Yukon, British Columbia. and Colorado. One frequent hike I lead treks on sections of the famed Chilkoot Trail in Alaska and British Columbia, following the route miners took to the Klondike Gold Rush. Though short, the sections of trail often are slick with wet rock, gnarled roots and thick mud. For someone new to hiking, having an extra hand—in the form of two poles in hand—provides a boost to ascend and descend steeper steps and scrabble around slippery hazards.
At the beginning of the hike, I always give a quick lesson on how to use poles effectively, which makes a huge difference. I find that apprehension about hiking fades after a few dozen steps with the help of trekking poles. They helped everyone from children to older adults hike the trail confidently and fall in love with trails, the way I did.
Trekking Poles for Advanced Hikers
But trekking poles can also help experienced hikers hike farther, see more and travel more confidently. The poles help Ever Meister, the Hike editor for the REI Co-op publications Expert Advice and Uncommon Path, appreciate the scenery more. "Because I'm a bit clumsy, when I'm on an unfamiliar technical trail I tend to keep my eyes glued to the path in front of me so I don't trip or lose my footing," says Meister. "Trekking poles help me feel like I can keep my eyes up and trust my feet to stay planted."
Trekking Poles for Injuries
Sometimes, trekking poles can be just the gear you need to get back on the trail after an injury. Used correctly, they help relieve stress on feet, ankles, back, legs and hips by utilizing upper-body strength in conjunction with lower-body strength. Poles also can aid upper-body injury recovery by adding stability in uneven terrain, saving wrists, arms and shoulders from sudden impacts such as slips or falls. (When choosing trekking poles, be sure that the weight and adjustability of the poles suits your post-injury needs.)
In an emergency, trekking poles can be incredibly useful. During Rob Deschambeault's summit bid on Colorado's Mt. Elbert, a lightning storm forced him back down the mountain. As he retreated, Deschambeault, a co-op member since the early 1990s (and the author's father) slipped on slick talus and landed on his hip. He was able to descend to tree line, but his hip pain grew more intense with every mile. After Deschambeault's hiking partner took his pack, the injured man relied on trekking poles—and the relief and stability they provided—to hike out under his own power. Without them, he would have needed to wait for search-and-rescue teams to hike miles into the backcountry to aid him.
Trekking Poles for Hikers with Disabilities
Hikers with disabilities use trekking poles in many ways, says Syren Nagakyrie, founder of Disabled Hikers and author of The Disabled Hiker's Guide to Western Washington and Oregon.
Nagakyrie says that as a disabled hiker, they use trekking poles for everything from "balancing over all types of terrain, not just the 'tricky' places; sitting down and standing up; [and] as a brace to elevate my legs while sitting. They help with my proprioception (or body awareness without looking) by giving me another sensory point to feel the physical connection between my body and the landscape around me."
Poles are much like hikers themselves, Nagakyrie says, in that everybody is a little different, and might find different ways to benefit from the gear. "While it is important to practice proper technique with hiking poles, the most important thing is to use them in the way that feels right for your body, which may mean adapting their use," they say. "I often reduce the height of the pole so that it is at cane height to provide better support or to relieve pressure in my wrist; poles with a cane handle also help." (Note: While trekking poles are excellent tools, they aren't mobility aids and aren't designed to support someone's full weight like braces, a walker or a medical cane would.) "If you find that trekking poles cause pain even with proper use," Nagakyrie adds, "then you may be relying on them too heavily for support. In that case, you may want to consider switching to a more supportive tool, like outdoor forearm crutches."
 What's the right trekking pole length for you?

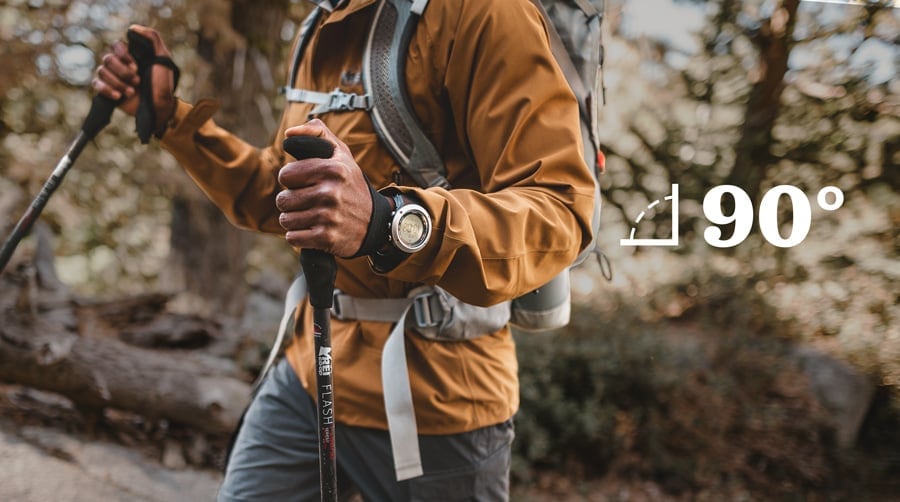
Holding your trekking pole at the right height is key. Improperly adjusted trekking poles can cause discomfort and soreness to your shoulders, back, knees and neck. But how do you know what's the right length? Most of the time, what's right is a right angle: A properly adjusted pole will allow you rest your elbows at a 90° angle when you grip the poles and tip rests on the ground near your feet. Many trekking poles come in adjustable lengths, which makes this easy to achieve. However, some are sold in fixed lengths, or in ranges of sizes.
Related reading: How to Choose Trekking Poles and Hiking Staffs
Adjusting Pole Length
For general hiking, adjust the length of the pole (as above) so that your arm makes that 90-degree bend at the elbow. This is the right length for most of your hiking, including flat and short uphill or downhill stints. Once you start hiking, though, feel free to play around with what height feels the most comfortable for you.
If you have poles that assemble from three sections, it's helpful to set the top adjustment so it's in the middle of the adjustment range, then set the bottom adjustment to the length that puts your arm at the correct angle. Then, if you need to make adjustments while hiking, you can use only the top adjustment to fine-tune the length rather than reaching down to the bottom sections.
For long uphill sections: Shorten each pole by about 5 to 10 cm (2 to 4 inches) to get more leverage and to plant the pole more securely as you climb. The steeper the slope, the shorter your poles should be. Your trekking poles should assist you in moving uphill without causing strain or fatigue to your shoulders. Your shoulders should never feel as if they are in an unnatural, lifted position (as if you were trying to pull yourself up on a bar) nor feel as if they are being pushed up into your backpack straps. If they do feel that way, you need to shorten your poles even more.
For long downhill sections: Lengthen each pole by about 5 to 10 cm (2 to 4 inches) from your "default" setting for general hiking. Raising your hands helps in a few ways. First, it keeps you more upright, and improves your balance. Second, it allows you to place some of the initial impact of the downward step on your poles, hands and upper body, which gives tired knees and legs a little break every time you plant a pole.
If you're on a long traversing section: You can shorten the pole on the uphill side and lengthen the pole on the downhill side as needed to improve comfort and stability. This should keep you "even" on the hillside.

 Getting the most from straps, baskets and tips
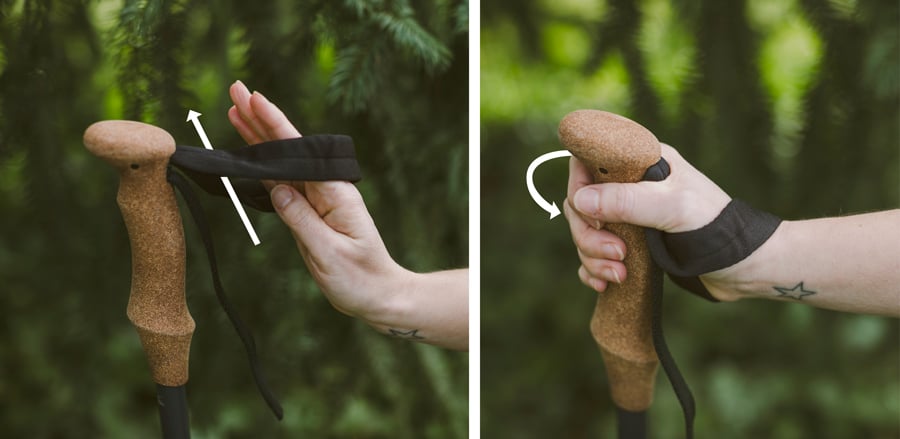
Using the wrist straps: Wrist straps make a trekking pole work well, yet it's common to see hikers using them wrong—or not at all. To use them the right way, put your hand up through the bottom of the strap and then pull down and grab the grip of the pole. This technique supports your wrist and heel of the hand and allows you to keep your hand relaxed on the grip.
Adjust the length of the strap so that when you bring your hand down on the strap it lines up with where you want it to rest on the grip. Proper strap adjustment allows you to let go of the pole to take a picture, grab a snack or adjust your backpack and then easily grab the pole again in the right place. This also makes it easier to retain the poles when you're wearing gloves, which can make a tight grip more difficult.
Some trekking poles have specific straps for the left- and right hands. Some also have straps that are padded to prevent chafing. When your day is done, clean the debris from your pole and let the straps dry before storing them to avoid mold and mildew.
Baskets: These small, removable pieces attach to the poles' tip end and help prevent your poles from getting stuck or sinking into soft terrain. Baskets are generally round and either solid (for mud) or snowflake shaped (for snow). Baskets help keep your poles from sinking into wet, soggy, muddy or snowy conditions; they can increase your stability (and keep your poles clean). Before you head out, take a quick look and make sure your poles are wearing the right ones for the expected conditions. If needed, swap them out before you hit the trail.
Pole tips: Carbide or steel tips are commonly used to provide traction, especially on ice and rough rock. Rubber tip protectors can extend the life of the tips and protect your gear when poles are stowed in your pack. They are also good to use in sensitive areas to reduce impact to the ground. Angled rubber walking tips (usually sold separately) work well on asphalt or other hard surfaces but can also be good for slick rock. Tip protectors weigh nothing, so toss them in your pack before a hike, or place them on your poles so you're sure to have them when you need them.
 Tips for Walking with Trekking Poles
OK, so you've got the right poles, and you know they fit you. Now what? Fortunately, there's not much of a learning curve to using trekking poles. Here are a handful of tips to set you on your way, more stable than ever:
Alternate your poles and legs. Most hikers quickly fall into the proper rhythm of planting a trekking pole in time with the opposing foot (right foot, left pole; left foot, right pole). Doing so removes weight from your leg by leveraging the strength in your opposite arm as you trek, while giving you more stability. If you fall out of the rhythm, just keep walking while lifting your poles off the ground for a moment until you can reset. Start planting the poles again when ready.
Walk naturally. When using trekking poles, walk naturally and maintain a natural arm swing. Don't overthink it. Walk as if you didn't have poles in your hands. Angle the poles slightly behind you so that as you plant them you can push off to aid your forward movement. Don't drive your poles into the ground. That only shocks your arms and shoulders. Instead, use the contact of your poles on the ground as a springboard to propel you forward.
Double plant for extra stability. Occasionally, you might want to double-plant your poles, such as on steep climbs or descents, where it's beneficial to have the extra stability of both poles on the ground. If it feels good, do it: Plant both poles at the same time and then take two steps forward. Lift and plant both poles again and continue.
Take care with the height of your poles for double planting, as you don't want to strain your shoulders by pulling yourself up too much on an ascent, or pushing your shoulders back from the impact on a steep descent.
How to Negotiate Obstacles
Trekking poles can be very helpful when you encounter obstacles in or around a trail.
Stream and river crossings: Trekking poles provide much-needed stability when you have to wade through water. Make sure each time you plant your pole, it's securely on the bottom before moving forward. If the water is deep, or the bottom is very rocky, lengthen your poles.
Puddles: You can maneuver around their edges, using your poles for stability, or you can do a "pole vault" to the other side by planting both poles and hopping over.
Large rocks: To surmount large rocks, plant both poles in the ground before and beside the rock and, as you step up on the rock, push down the poles to help vault you onto (and then over) the rock.
Logs: To step over a log, simply plant the poles in the ground behind the log and use them for stability. If you're walking on a log to get across water, use the poles to improve your balance by reaching out with them to both sides (picture a tightrope walker using a large pole for balance). If the log is low enough and the water is shallow enough, you may be able to lengthen your poles to reach down into the water for added stability.
Using Poles with Your Tent
Some lightweight tents and tarps require trekking poles for proper pitching. If you own one of these, make certain before you set out that your poles are compatible not only with you, but with your tent or tarp. Often, adjustable poles work best because the height can be varied, making setup easier.
You can also use your trekking poles to help secure the guy lines of your tent when trees or rocks aren't readily available. Check out How to Set Up a Tent for more tips on to make your poles ultra-versatile.


