Nowadays, whether you're in town or on a trail, most people are walking around with a smartphone in their pocket. These powerful and compact devices come in handy in a number of ways in the wild, from letting you check your location on a topo map to identifying stars in the night sky. And, of course, you can use them to snap high-quality photos of your journey.
Taking a photo with a phone is quick and intuitive: You open the camera app, point and tap. But, when you swipe through your pics from your last big adventure, you might wish more of them were worthy of sharing or being hung up on your wall.
Here are nine tips for taking better outdoor photos on your phone:
1. Know Your Camera
Smartphones come loaded with a default camera app for taking photos. For many people, this app has all the functionality needed to take great pictures. Here are some of the basic features to look for and learn how to use:
- Exposure adjustment: Many default camera apps let you adjust the exposure of an image. You may need to tap and hold or swipe to do so. Adjusting the exposure gives you control over how light or dark the final image will appear.
- Focal point and exposure level lock: On many phones, you can press and hold your finger on a subject to lock the focal point and exposure. This ensures that subject will be in focus and exposed just how you want it to be when you click the shutter.
- HDR mode: When you take a photo in high dynamic range (HDR) mode, your camera actually snaps several pictures at different exposures and then combines them to create a single image. This is a great way to capture the full range of lights and darks that are in a scene. Using HDR can be especially effective when you're taking pics of beautiful landscapes that have a range of color and brightness, such as sunrise over the countryside. You'll want to play around with HDR to figure out when to use it and when not to. In some instances HDR doesn't do such a great job, like when you're trying to take a picture of a subject in motion.
- Timer: A timer is handy when you want to be included in the group photo or for snapping pics in low light when even the slightest tap to take the photo can bump the camera and blur the image.
- Flash on/off: In most cases, you'll get better results by using natural light rather than resorting to the phone's harsh built-in flash, so make sure you know how to turn the flash off.
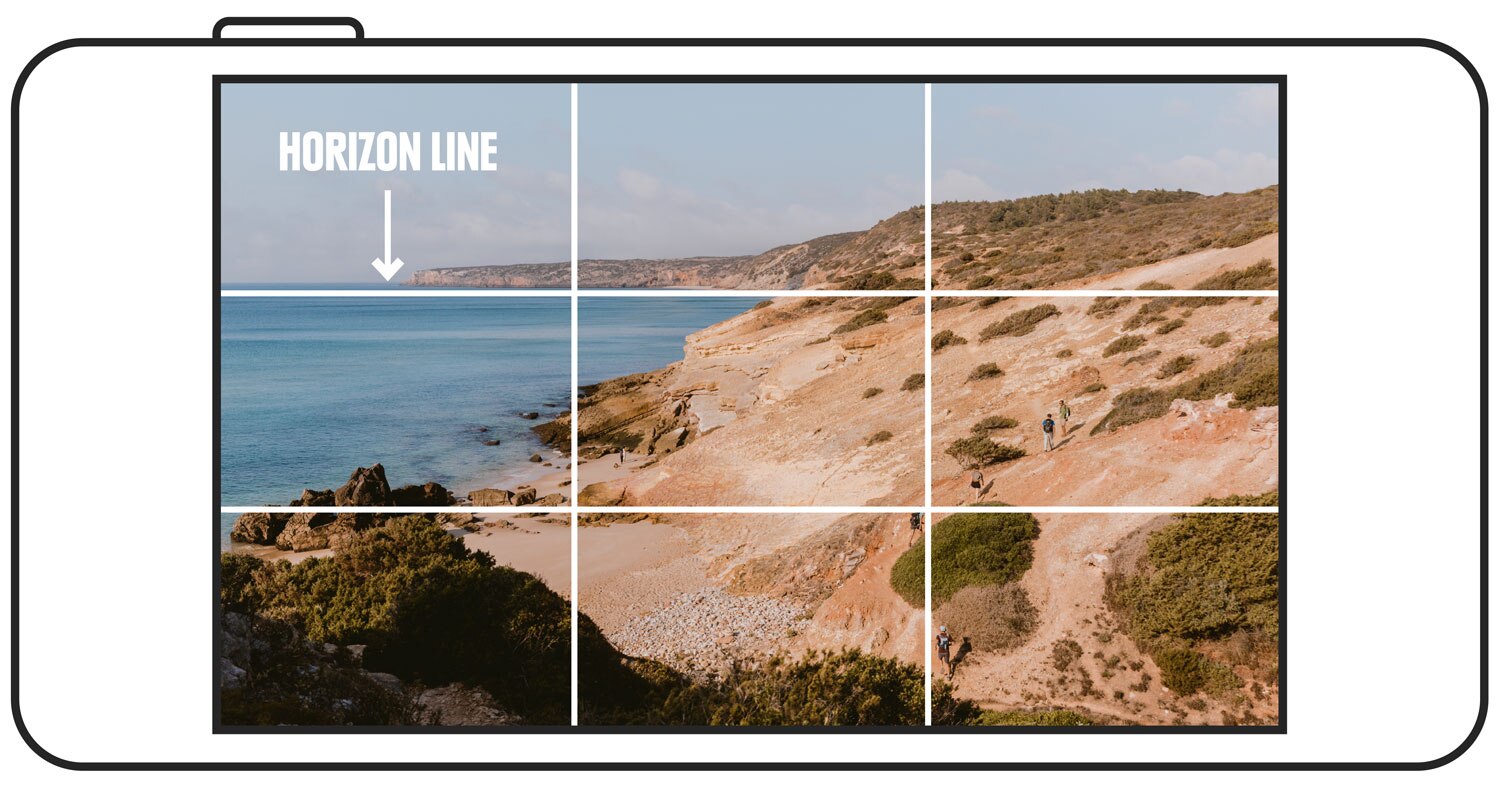
- Add gridlines: Go into the settings for your camera and turn on the gridlines. With a grid overlaid on your camera, it will be easier to compose your photos and get the horizon line level.
2. Use a Third-Party Camera App
If your default camera app lacks any of the basic features listed above or you long for even greater control when taking pictures, you'll want to download a third-party camera app (some are free, others you will have to pay for). These apps can unlock a ton of functionality, including:
- Shutter speed adjustment: Shutter speed is how long the camera's shutter is open and exposing your phone's sensor to light. With a faster shutter speed, less light reaches the sensor, which will stop the motion of moving objects. With a slower shutter speed, more light reaches the sensor, which will blur the motion. By being able to adjust shutter speed, you gain a bunch of creative control over the final exposure. For instance, if you're taking pictures of a friend riding on a bike, you could increase the shutter speed to freeze the motion for a sharp image. Or you could slow down the shutter speed to blur the movement of the rider. If you use a slow shutter speed, you'll want to put your phone on a small tripod to prevent camera shake from blurring the image.
- ISO adjustment: Like shutter speed adjustment, ISO adjustment is a way you can control the final exposure of the image. ISO comes from the days of shooting film and was used to rate how sensitive the film was to light. These days it's used to rate how sensitive the camera's digital sensor is to light. By increasing the ISO in your phone's camera, you're making the sensor more sensitive to light, which will allow you to take pictures in lower light. However, keep in mind that the higher you boost the ISO the more likely it is that you'll lose a bit of image quality; a higher ISO often results in a grainier image.
- Burst mode: Burst mode fires off a bunch of pictures in just a matter of seconds. This is great for capturing quick-moving objects, like your buddy launching off a ski jump.
- Image stabilization: If you're shooting in low light and struggling to get sharp images, try using an app with image stabilization. This can help eliminate blur caused by camera shake.
- File formats: Some apps will allow you to save images in different file formats, such as RAW, to preserve image quality. This is especially nice if you plan to do a bit of editing after taking the picture.
3. Use the Rule of Thirds
You know a good photo when you see one. But, what is it exactly that makes it good? A lot of it is in the composition, and one of the most basic compositional techniques is the rule of thirds.
The rule of thirds says that by breaking your image up into thirds vertically and horizontally with gridlines and positioning the subject(s) either along the lines or at the intersection of two lines, you'll end up with a more balanced and visually interesting picture. For example, rather than composing a photo so that your friend is smack dab in the middle, try taking the picture with them positioned off to one side. Or, when you're shooting a beautiful landscape, try placing the horizon at the top or bottom third of the photo rather than cutting across the middle. Turning on the grid in your phone's camera app is an easy way to keep the rule of thirds top of mind while taking pictures.
4. Make Use of Leading Lines
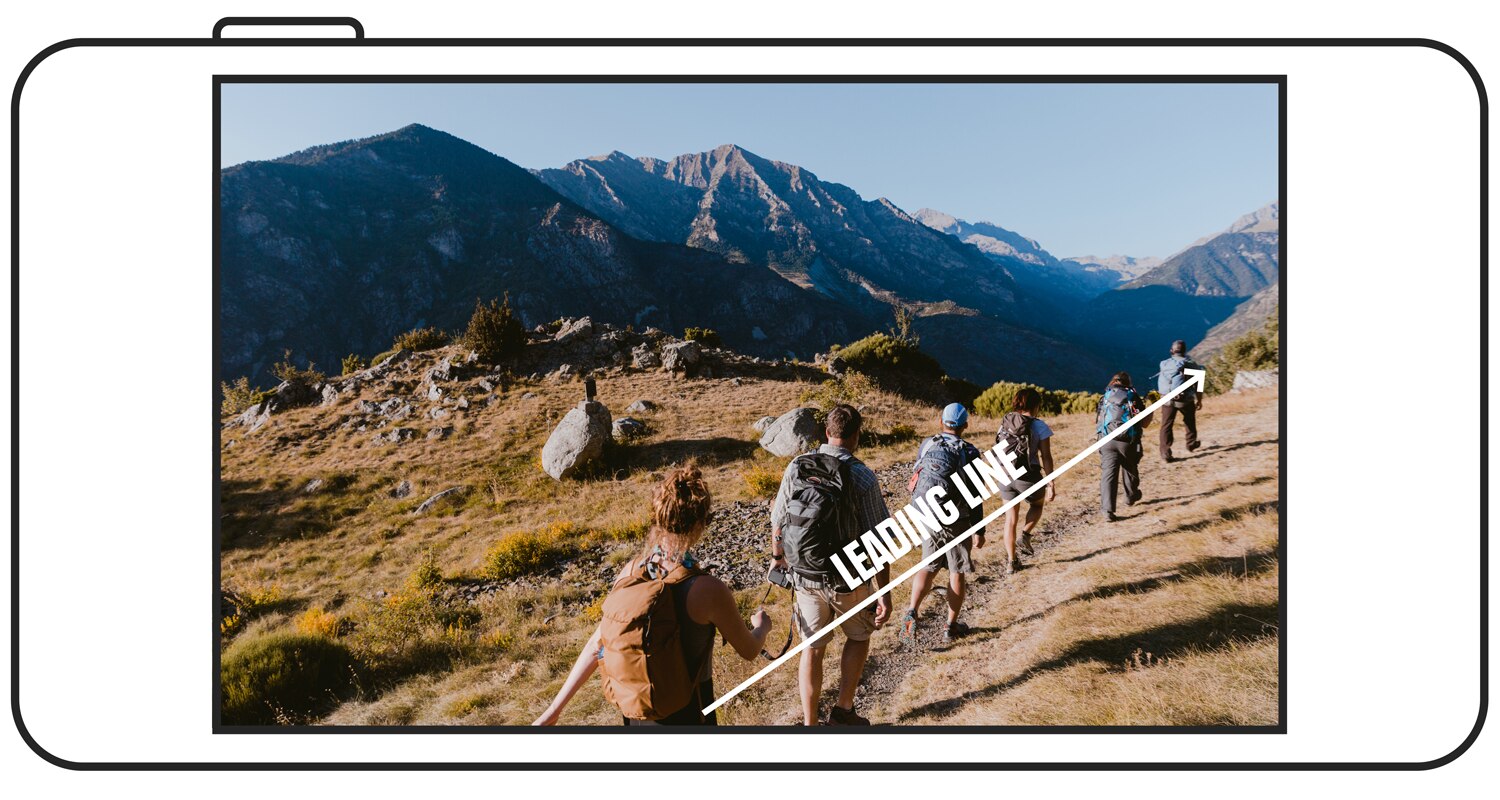
Carefully composing lines in your pictures is a powerful way of drawing the viewer's attention to the main subject and creating a sense of movement through the image. For instance, a picture that shows a hiking trail coming in from the bottom left of the image and going off into the distance at the upper right can guide the viewer's eye through the image to the solo hiker at the end of the trail. Trails naturally make good leading lines, but so do roads, rivers, shorelines, trees and cliffs.
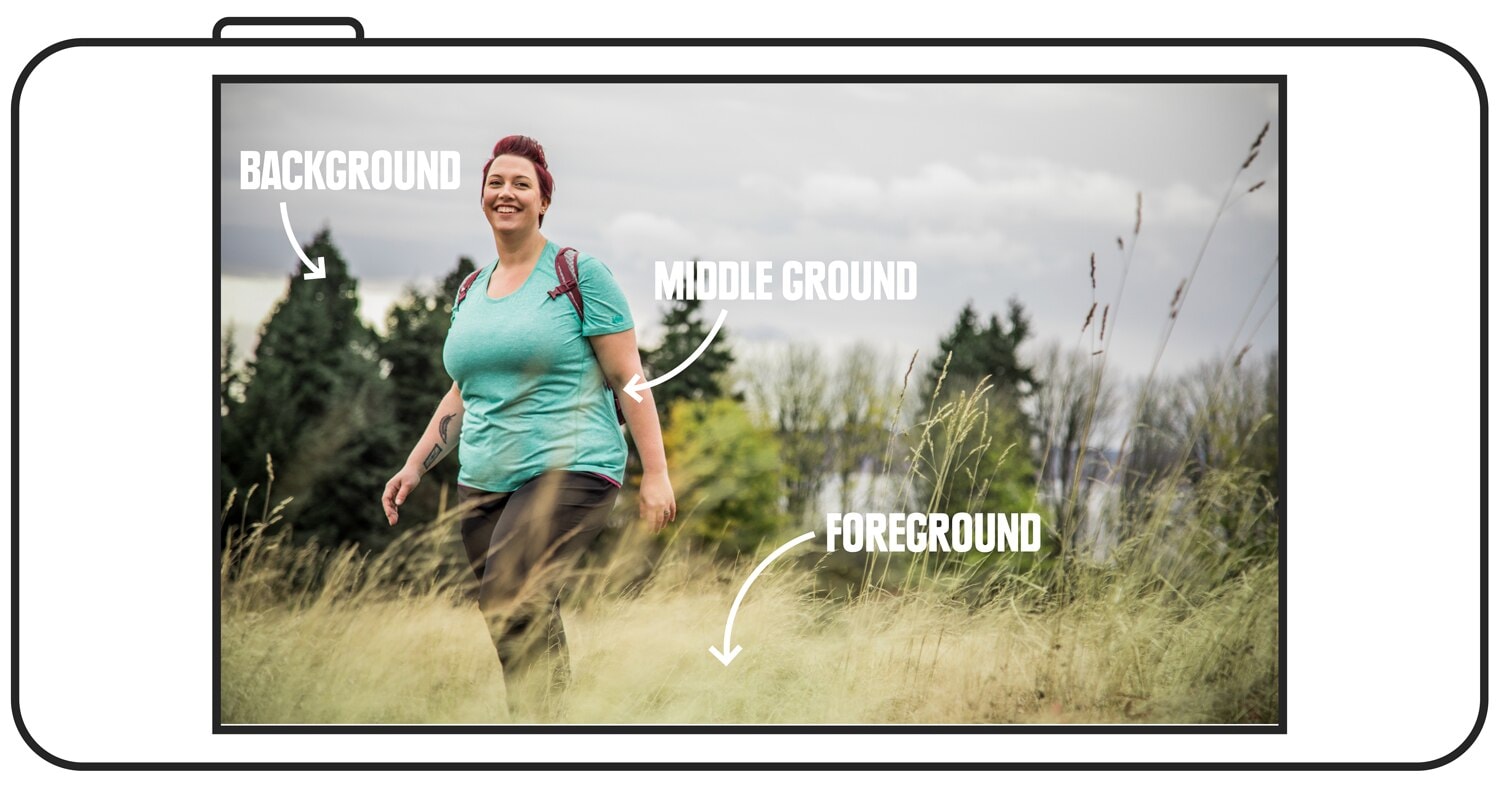
5. Use the Foreground, Middle Ground and Background
When composing your photos, try to include interesting elements in the foreground, middle ground and/or background. For example, if you're taking a picture of the sun setting behind a mountainous horizon, rather than only including the horizon line in the photo, try incorporating something interesting in the foreground and/or middle ground to draw the viewer's eye through the image. This could be a person, a group of trees, some rocks or a beautiful lake.
If you want to play around with blurring the foreground, middle ground and/or background, you'll need to see if your camera app has a mode that can do this, such as a portrait mode, since most smartphone cameras won't let you adjust the aperture for a shallow depth of field. You can also add blurring to photos with many editing apps (look for something called lens blur or similar). See tip No. 8 for more about editing your photos.
6. Change Your Perspective
When using a phone camera, it's easy to get in the habit of always holding your phone in front of you with outstretched arms and snapping photos from head height. But phones are so small and light that you can easily mix things up and shoot from just about any perspective. Try changing your viewpoint by taking photos from a bird's-eye view or worm's-eye view. Or, you can shoot from the hip. You can also try getting really close to your subject—as close as your phone will allow while still being able to focus.
7. Add Camera Accessories
Add-ons for phone cameras can help you achieve a variety of creative elements that you might want to capture. For example, if you want to take longer exposures of a beautiful stream in order to blur the movement of water, you'll need a mini tripod to stabilize your camera. Another option is to add lenses to your phone so you can take fish-eye, macro and wide-angle photos.
8. Edit Your Photos
A little photo editing can go a long way toward improving your photos. Most default camera apps that come on smartphones allow some level of editing, but by downloading a third-party app like Snapseed (iPhone or Android) or Adobe Lightroom CC (iPhone or Android) you get a lot more control. Apps like these allow you to adjust brightness, tweak contrast, boost saturation, apply filters, sharpen fuzzy images and a whole lot more. Most of them also have auto adjustments that make it really quick and easy to edit photos.
9. Add Motion
If you're struggling to capture the grandeur of the scene around you with a still photo, try playing around with time-lapse, slo-mo and video. These come standard on most phone camera apps and can be a fun and beautiful way to capture things like moving water, the setting sun or your friend goofing around on the trail.
