You've seen the professionals ripping powder and you're excited to get on your snowboard and give it a try. Before you can start carving turns, you'll need to learn the basics: how to put on your boots and how to get into your snowboard bindings. Nailing these steps will pay off in more enjoyable days on the mountain.
Video: How to Put on Your Snowboard
How to Put On Snowboard Boots

Getting into your snowboard boots
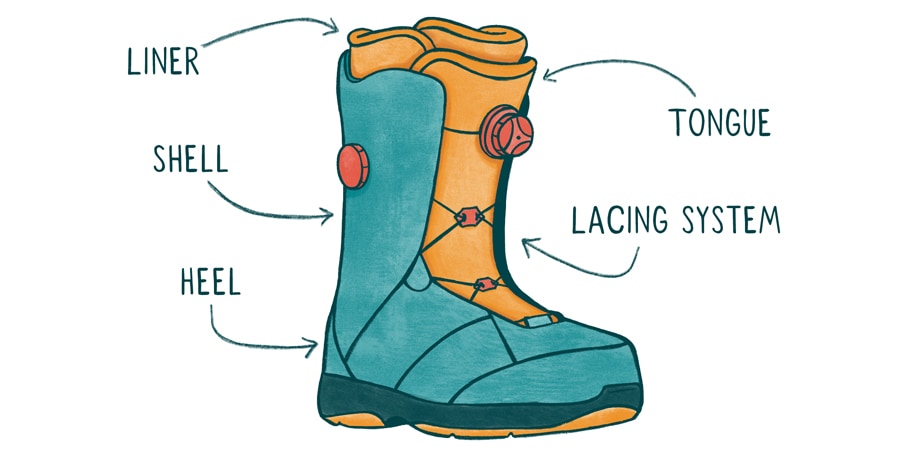
- Pull the tongue of the liner and shell forward and loosen all the laces on both the liner and outer lacing systems to open up your boot.
- Slide your foot all the way into the boot.
- Tap the heel of the boot on the ground to set your heel in the pocket.
- Make sure the liner is tucked in and against your shin before you start lacing up.
- Tighten the inner laces so the liner is snug and hugging your shin. How you fasten your laces will depend on the lacing system you have. (See below)
- Lace up your outer shell. Your boot should fit snug but not so tight that it cuts off the circulation to your feet.
- Stand up and flex your ankles (as if you're getting into a squat) and tighten the laces some more.
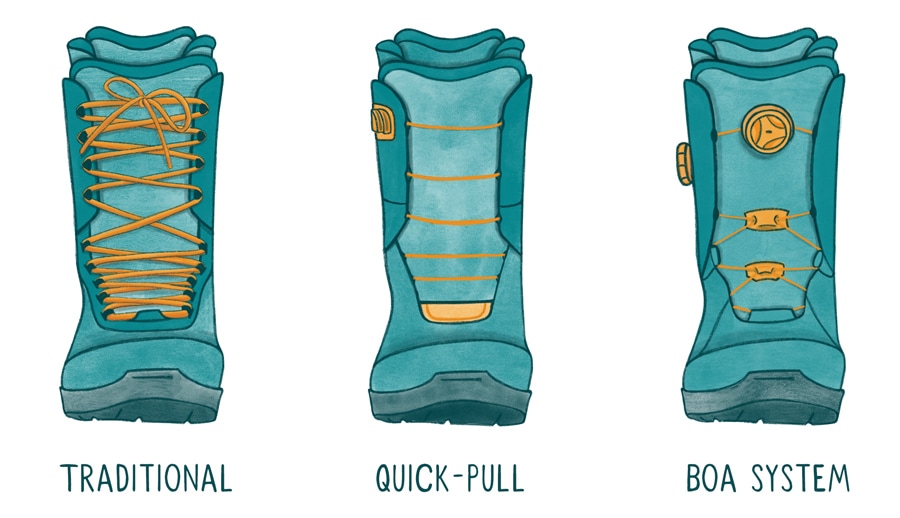
How to tighten your laces. How to tighten your boot depends on your boot's lacing system—traditional, quick-pull or Boa®.

- Traditional. Tie the laces together as you would a typical sneaker. Start at the bottom and work your way to the top, making sure the laces are snug as you move up.
- Quick-pull, also called speed lacing. This system has a single tab or handle that holds the laces together. Disengage the locking system to release tension on the laces to loosen them up. Pull the tab up to tighten the laces. Lock it in place and roll up the extra lace and tuck the tab to the side. Many boots come with built-in pockets to clip or tuck away the tab.
- Boa system. This system allows you to tighten your boots using one or more dials. Push the dial in to engage the lacing system and turn the wheel clockwise to tighten the laces and adjust your fit. Some boots may have separate dials to cinch the upper and lower parts of your boot. To get out of the boot, pull the dial out to release the tension on the laces.
How to make sure you have a good fit
- Snowboard boots should be laced tightly yet still feel comfortable. You shouldn't feel any pressure points on your feet. Ankles and heels should remain securely in place.
- When standing up, your toes should slightly touch the front liner - you shouldn't be able to wiggle or curl your toes much at all.
- When you flex your knees, your heels should remain locked down. Too much heel lift (when your heel rises inside your boot) could lead to ankle or foot pain.
How to Strap Into Your Strap Snowboard Bindings

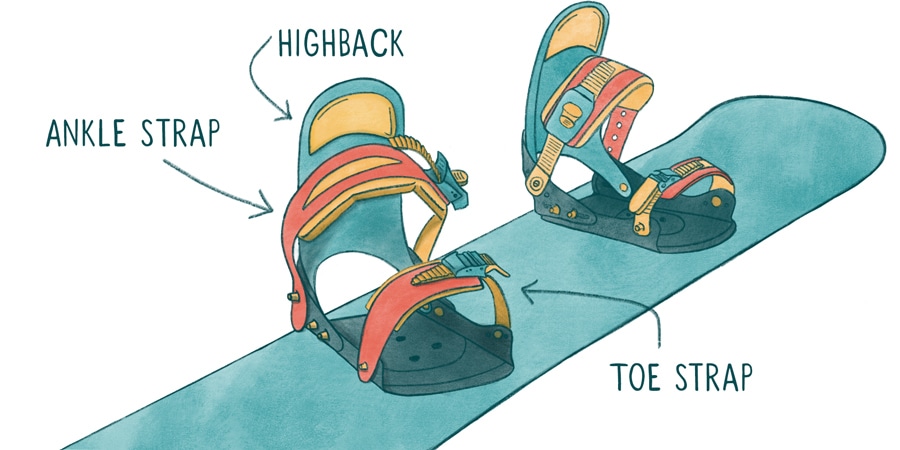
Strap bindings are the most common type of snowboard bindings; rear-entry and step-in bindings are two others. Strap bindings have straps that ratchet down to secure your feet. To get into this traditional setup:
- Place your board on relatively flat ground perpendicular to the fall line so the board doesn't slide away from you.
- Make sure the highback (the binding piece that folds up and down) and straps are out of the way and the base is cleared of snow.
- Step into the front binding. Which foot (left or right) leads downhill depends on the way your binding was set up (regular or goofy). Don't worry about the free foot for now; you'll strap into the front binding first and use your free foot to skate across snow.
- Once you step into your binding, make sure your heel is snug against the highback, which supports your calf.
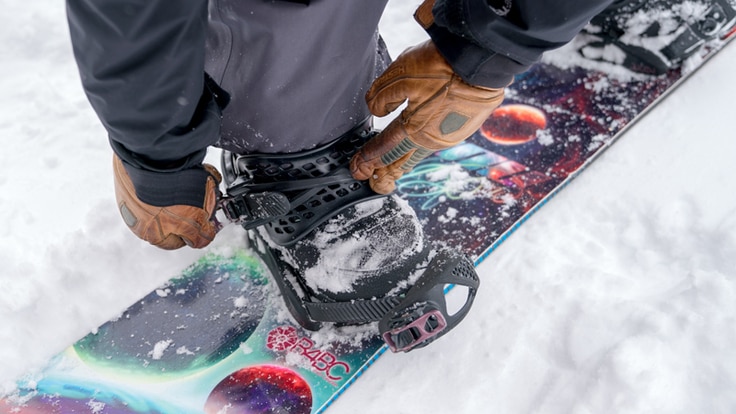
- Ratchet down the ankle strap first to set your heel into the binding and then fasten the toe strap. Your foot should feel snug and secure without pinching.
- You'll strap the second foot into the board when you're ready to ride.
Getting Out of Your Bindings
- When using the chairlift or getting around on flats, take your back foot out of the binding to skate around.
- Most bindings release if you pull up on the ratchet so the straps loosen.
How to Get Into Step-in Snowboard Bindings
Step-in bindings use a locking mechanism (like toe and heel cleats) to connect your boots to the board so you can click in and ride. LHere is a step-by-step breakdown of how to get into Step On bindings. To learn more, check out our article What Are Step-In Bindings?
- Place your board on relatively flat ground perpendicular to the fall line so the board doesn't slide away from you.
- Clear any snow off the base of the bindings before stepping in.
- Start with the heel. Press the heel of the boot into the heel clip on the highback of the binding until you hear a click. Press down until you hear a second click. (Tip: Ensure that your pant leg is in the metal clip on the back of your Step On boots to prevent it from getting caught.)
- Next, lock in your boot at the toes. Apply pressure so your toe cleats click into the side toe hooks on your bindings. Wiggle your boot from side to side to make sure both toe cleats are locked.
- You're ready to ride!
What to Do Before Putting On Snowboard Boots
Find the right snowboard boots. Snowboard boots that fit well can make a huge difference in whether or not you enjoy a blister-free day on the mountain. Proper-fitting boots can also help you make turns easier and control your snowboard better. Take the time to find the right snowboard boots for the shape of your feet and your riding style. Beginners may opt for a softer-flexing boot for comfort while more advanced riders may want stiffer boots that offer greater edging power and control.
- Check out our video on How to Size Snowboard Boots
- If you can't make it into a store, call us at 800-426-4840 and consult with one of our experts.
Wear one pair of socks. To keep your feet warm and dry, avoid socks that are too thick and that are made of cotton. Socks made of wool or synthetic materials wick moisture away from the skin and retain warmth better than cotton, which absorbs moisture when you sweat and takes a long time to dry. Snowboard-specific socks go up to the knees and provide your shins added cushion and protection. Start with socks that are completely dry and pull them up all the way. Avoid wrinkles that can bunch up in your boots and lead to blisters. Avoid tucking in your base layers if possible and leave your snow pants outside the boots as well.
Remember: Safety is your responsibility. No internet article or video can replace proper instruction and experience—this article is intended solely as supplemental information. Be sure you're practiced in proper techniques and safety requirements before you engage in any outdoors activity.
