Your brakes are without a doubt one of the most important parts of your bike. They must be clean, in good condition and properly adjusted before every ride.
Over time and after lots of miles on the trail or road, disc brakes lose some of their effectiveness. This leads to longer response times, less efficient braking and less bike control.

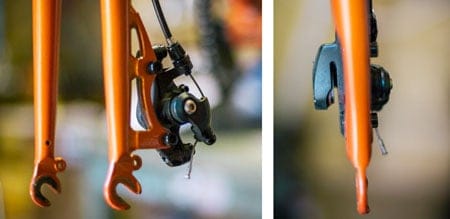
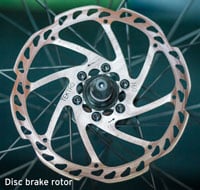
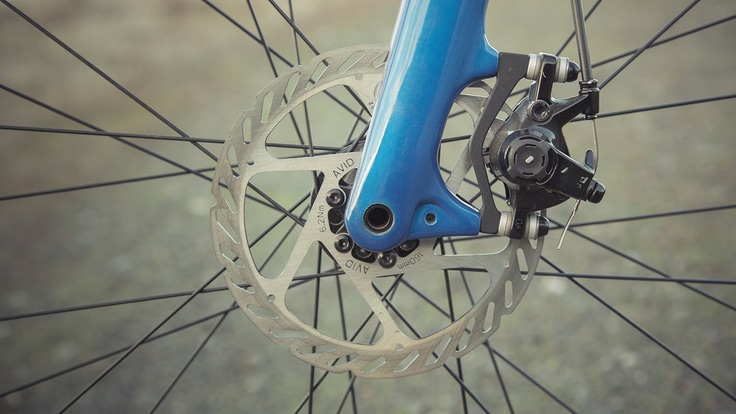
Disc brakes use calipers mounted to the fork in front and the frame in back, and rotors (the discs) mounted to the wheel hubs. When you squeeze the brake levers, the brake pads inside the calipers squeeze the discs to slow the wheels.
Almost all modern mountain bikes come equipped with disc brakes, and more and more road and commuter bikes now feature them.
Note: Basic brake system maintenance involves making sure that brake components are properly positioned and in good working order. Full brake "adjustments" are beyond the scope of this introductory overview, and are not described here.
How Often Should I Check My Brakes?
Give your brakes an overall check before every ride. Make sure your brake components are properly positioned and in good working order.
In addition to your pre-ride checks, have your brakes inspected and serviced regularly by an experienced mechanic to catch problems that you may not be experienced enough to spot and/or fix (every six months or so should be fine for occasional cyclists). Take your bike in more often if you ride hard and/or frequently.
How to Check and Adjust Brake Assemblies

Brake assemblies include the brake calipers and the brake pads. These assemblies can be installed incorrectly or get jarred out of proper position as a result of aggressive riding, accidents or crashes. They should be checked to make sure that all component parts move freely and are properly positioned, and that all bolts are snug.
How to Check Brake Assemblies
To check the position of your brake assemblies, visually inspect both the front and the rear calipers and make sure the rotors are centered between the brake pads. Each pad should make contact fully with the rotor when the brake is engaged.
How to Fix Brake Assemblies
Off-center or miss-alligned brakes cause one side of the brakes to make contact with the rotor before the other one does, resulting in poor braking power and noise. Re-adjustment in many cases involves simply loosening the bolts and moving the caliper slightly from side to side to properly position it. Some calipers require that you add or remove shims to center the calipers over the rotors.
Also, check to make sure the bolts on the rotors and calipers are snug. Loose parts can vibrate and cause noise while braking.
How to Check and Clean Brake Pads

Disc brakes have pads that wear down over time due to normal use. This can lead to slower brake response times, and it can require more effort from you to engage your brakes.
Look to see if your brake pads are glazed or significantly worn. Check the pads by removing the wheel and looking into the space where the rotor spins. If the pads are glazed, remove them from the calipers and lightly scuff them on a piece of sandpaper laid on a flat surface. If the pads are less than 3mm thick, including their metal holder, they need to be replaced.
Squealing disc brakes are often caused by pad contamination. Disc brake pads can be ruined by even the tiniest amount of oil, including the oil from your skin, so whenever you handle them try to minimize contact of the braking surface with your bare skin. If you do touch the pads, clean them with rubbing alcohol or a product designed specifically for cleaning disc brake pads. Then rough the pads lightly with sandpaper.
Brake Rotors

Inspect the brake rotors (discs) for dirt and debris. Also look to make sure the rotors are straight and that they don't rub on the brake pads.
If the rotors are especially dirty, clean them with rubbing alcohol and then rough them lightly with sandpaper.
While you're looking at the rotors, check to make sure all the bolts that attach the rotors to the wheels are snug. Loose parts vibrate and cause noise while braking.
Brake Levers

Your brake levers can get gummed up with grime and dirt over time. They can also slip out of position on your handlebar. If you have hydraulic disc brakes, look for signs of leaking brake fluid near the levers.
How to Check Brake Levers
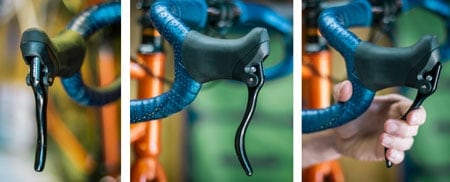
Your brake levers sit on your handlebars and are the way you engage your brakes when you're riding. To check them, simply squeeze them. When your levers are fully engaged, there should be approximately one inch of space between the inside edge of each lever and your handlebar.
Your brakes should hold solidly against your leaning weight. The levers should be mounted firmly on your handlebar (test each brake lever separately, by pushing up, down and laterally) and they should move smoothly when squeezed, without jerking or squeaking.
Note: With hydraulic disc brakes, never squeeze your brake levers when the wheel is removed from the frame or fork. Doing so causes the self-adjusting brake pads to clamp tightly and it can be difficult to separate them.
If you find that your levers are not responding as they should, there are several steps you can take.
How to Fix Brake Levers
Clean and lubricate the levers: If you're experiencing poor braking performance, the levers themselves may need cleaning or repair. Try applying a very small amount of lubricating oil to the pivot areas while squeezing the levers open and closed.
If you have mechanical disc brakes, it's also a good idea to wipe down and lightly lubricate your brake cables every few months (or whenever signs of grime and/or rust appear on their visible surfaces). Lubricate by applying a small amount of bike oil to the cable near the cable guides and housings. Be careful not to get any lubricant on your brake pads or rotors.
Bleed your brakes: If you have hydraulic disc brakes and the levers feel spongy when you squeeze them, there may be air in the hydraulics. To remove the air, you'll need to bleed the brakes. Bleeding is a procedure that purges the hydraulic hoses of any air bubbles. Read a bike maintenance book to learn how to bleed your brakes, or take your bike to a bike shop for service.
Reposition your brake pads: If you have mechanical disc brakes, your brake pads may not be close enough to the rotors. Before you reposition them, check to make sure that the pads are not worn down too far. If the pads are less than 3mm thick, including their metal holder, they need to be replaced.
If the pads are okay, turn the adjustment dials located on the calipers to bring the pads closer to the rotors. The proper distance between the rotor and brake pads depends on the style of brakes you have, so consult the instruction manual provided with your brakes.
Note: hydraulic disc brakes have self-adjusting brake pads that ensure consistent lever pull so there are no adjustment dials on hydraulic calipers.
Brake Hoses, Cables and Housings

If you have hydraulic disc brakes, inspect all hydraulic hoses and fittings for leaks. Leaks can sometimes be tough to detect. However, dirt tends to build up where there are leaks, so that's one sign to look for. If you find a leak, take your bike to a shop.
Mechanical disc brakes use cables and housings just like rim brakes. Cables can fray, rust and/or weaken over time. When this happens, the extra slack in the system can cause a slow response when you squeeze the brake levers. In addition, the flexible cable housings that protect your brake cables can break, corrode, clog up or fray over time. Cables should move freely through all cable housings and the guides that hold them in place. If they don't, take your bike to a shop for service.
