Have you ever wondered how those super-fast backpackers fit everything they need into a tiny rucksack? A common strategy is to forgo certain nonessential items, like sleeping pads and full-size toothbrushes. Another common item to ditch: your stove.
The average backpacking cook setup weighs somewhere between 16 and 24 ounces, or about the weight of a basketball. Plus, it can also take up valuable space. Instead of packing a bulky stove, fuel canister and cooking pot, some minimalist backpackers choose to “cold soak” their food—rehydrate their meal by soaking it in treated water instead of cooking it. Using this method, they can drop their pack weight (it can also help you save time you'd spend cooking or cleaning camp dishes). But the benefits of a lighter carry are nuanced and come with trade-offs. Curious to try? In this guide we’ll look at properly cold soaking your food and offer tips for making the most of your stoveless meals.
What is Cold Soaking?
Cold soaking is a popular no-cook approach to meal planning and cutting pack weight when backpacking—it just takes a little preparation and some trial-and-error. While traditional cooking setups allow you to pull your system out of your pack and immediately start warming a meal, cold soaking requires forethought. Not only do you have to allow time for your meals to rehydrate, but you also must carefully choose your food options or risk ending up with crunchy bits.
Most cold-soakers pack a single container from which they both soak and eat meals. When it comes time to prepare food, they’ll simply dump the contents of their ramen packet or powdered mashed potatoes into the container to rehydrate them for dinner. Some hikers also rehydrate their food directly in its storage bag if it's sealable. Using a jar with a slosh-proof lid (or a store-bought dehydrated meal’s resealable pouch) also allows you to rehydrate your food while you hike, prompting many trekkers to carry jars or cook pots with screw-on lids. Other backpackers repurpose items with reliable lids, like peanut butter containers or ice cream jars.
Pro Tip: Stop hiking about 30 minutes to an hour (depending on what you’re rehydrating) before you expect to be at camp to rehydrate your food. This gives it plenty of time to rehydrate while you’re walking, enabling you to eat as soon as you get to camp.
The Pros and Cons of Cold Soaking
Beyond outside factors, choosing the right cooking strategy comes down to preferences and trail priorities. If the goal is to travel light and fast, cold soaking food is a helpful strategy for cutting pack weight. Those who care more about a warm meal than moving fast may prefer the company of a good stove.
Cold soaking’s biggest benefit is the weight savings of ditching your stove. It’s also a more affordable option for backpackers on a budget, given that typical stove setups cost upward of $100 (compared to a cheap or recycled reusable jar). In addition to providing cost savings, cold soakers don’t have to carry fuel, and the clean-up process is usually easier. Many hikers also prefer this “cooking” method because it allows them to mitigate risk during fire bans. As wildfires become more prevalent, many parts of the country enact temporary fire bans. While some areas may make exceptions for stoves that come with an “on/off” switch, some backpackers choose to eliminate the risk by leaving their stove at home.
However, leaving a stove behind can pose a safety risk in cold conditions. One common way to combat hypothermia is by warming yourself with hot liquids. Additionally, some foods don’t rehydrate well or quickly with cold or lukewarm water, and many backpackers endure a trial-and-error process when learning how to cold soak—they can end up with inedible or unpalatable food in the beginning. Additionally, some backpackers appreciate the comfort of a warm meal at the end of a long day or a warm mug of coffee in the morning. No stove = no hot cup of joe, and cold instant coffee or caffeine pills aren’t for everyone. A stove is also a great back-up water purifier since you can also boil water to make it safe to drink.
When choosing a cooking method, backpackers should consider a few factors, like potential weather conditions, environment, active fire bans, and food resupply options. For instance, excessive heat and wildfire danger might encourage a hiker to ditch their stove. On the flip side, varying elevations, colder temps and hard-to-rehydrate food options might drive a person to pack a stove.
Pro Tip: If you’re thinking about cold-soaking your food for a long backpacking trip, consider testing out your system over the course of a weekend. It’s much better to verify that you’ll be able to stomach cold food when you’re close to home versus finding out while you’re deep in the backcountry.
How to Cold Soak
Cold soaking food is simple. Here are the basic steps:
Place your food in a leakproof container or jar.
Pour in filtered or purified water until food is covered.
Allow the food time to rehydrate. (Rehydration time can vary. We’ve included estimates for several common food items below.)
Stir and eat.
Keep in mind that nailing the exact water measurements can be a challenge. To avoid a watered-down dinner, test proportions at home before you head out on your expedition.
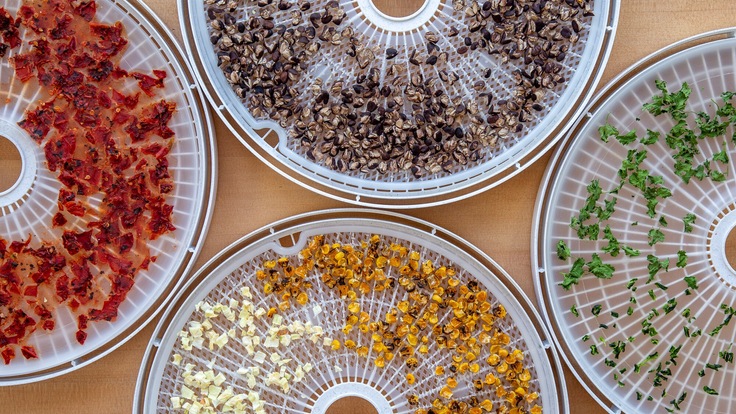
Pro Tip: Backpackers will often pack sauces, seasonings and condiments to add a little bit of extra flavor to their cold-soaked meals. Stash any extra sauce packets you get from fast-food joints for your next trip. You can also dehydrate some of your favorite meals, like chicken and instant rice, while you’re at home to enjoy while on trail.
Related Reading: How to Dehydrate Food
Suggested Rehydration Times:
Instant mashed potatoes: 0 minutes
Couscous: 5 to 10 minutes
Ramen noodles: 20 to 30 minutes
Dehydrated refried beans: 5 to 30 minutes
Pasta: 1 to 2 hours (or longer, depending on the pasta)
Dehydrated vegetables: 10 to 30 minutes
Pro Tip: Some grocers sell bulk foods that can be easily rehydrated. You can stock up on items like dehydrated refried beans and dehydrated vegetables (for some much-needed backcountry nutrients) at these stores. If you’re thru-hiking, this strategy makes resupply packages more varied than traditional resupplies.
Related Reading: Thru-Hiking Basics
Best Foods for Cold Soaking
Many of the quick-cooking, instant foods that are staples of backpacking meals are great candidates for cold-soaking, like ramen noodles, instant refried beans, couscous, dehydrated macaroni and powdered hummus.
Some foods are easier to rehydrate than others: For example, the crunchier the raw food, the more time it will likely take to rehydrate. So, foods like pasta and rice will take a lot longer than, say, instant mashed potatoes or couscous. If you find yourself determined to rehydrate pasta or rice, instant options are much quicker. Keep in mind that smaller grains and pastas, like macaroni, rehydrate faster than larger ones, like spaghetti. In fact, when it comes to pasta, it's best to choose one that's already been cooked and dehydrated. Pro tip: If you're craving a starchy comfort food, purchase a boxed macaroni-and-cheese option from the store. The pastas in these meal kits are typically precooked and dehydrated, making them easy to rehydrate on the trail.
Packing in Protein while Cold Soaking
Protein is an important building-block food for athletes. But many packaged foods include more carbs than protein, making it difficult for backpackers to get their daily allotment while on the trail. To make sure you’re getting the nutrients you need, consider carrying food items like beef jerky, salami, tuna, nuts, nut butters or pepperoni, especially if you’re on a several-day trip. For a bit of extra flavor, you can add some of these food items to your cold-soaked meals.
Related Reading: Meal Planning for Ultralight Backpacking
Cold Soaking and Food Safety
Any time you’re leaving food in lukewarm conditions, you can expect bacterial growth to take place. While backpackers often pride themselves on being hardy, following the USDA’s guidelines for food safety will help prevent gastrointestinal upsets and other foodborne illness while in the backcountry. Always remember to filter and/or purify your water before using it to soak your food if you’re using water from a natural source.

